


ME003-01 09/04/2014
5
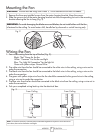
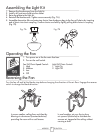
Mounting the Fan
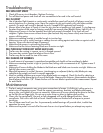
Wiring the Fan
WARNING: The fan must be hung with a least 2,1 m of clearance from oor to blades.
1. Remove the three pre-installed screws from the motor hanging bracket. Keep the screws.
2. Slide the narrow end of the motor hanging bracket into the corresponding cut-out in the mounting
bracket allowing the fan to hang (Fig. 2).
WARNING: To avoid damaging the blade arms and blades, do not install either until the fan
is fastened to the ceiling. To avoid motor shift, handle fan by downrod or switch housing only.
1. Four wires coming from the top of the fan (Fig. 3):
Black: “Hot” Power for the fan
White: “Common” For the fan and light
Blue: “For Light Kit Connection” for the light kit
Green with yellow stripe: Ground Wire
2. The white wire from the fan should be connected to the white wire in the ceiling, using a wire nut to
make the connection.
3. The black wire from the fan should be connected to the black wire in the ceiling, using a wire nut to
make the connection.
4. The green with yellow stripe wire from the fan should be connected to the ground wire in the ceiling,
using a wire nut to make the connection.
5. The blue wire from the fan should be connected to the black wire from the ceiling, using a wire nut to
make the connection.
6. Tuck your completed wiring back up into the electrical box.
Note: To connect the wires, hold the bare metal leads together and place a wire connector
over them, then twist clockwise until tight.
(Grounding)
Green/Yellow
Stripe
From Fan
From Ceiling
White
Black
Blue
(Grounded)
(Ungrounded)
From Fan
From Ceiling
Fig. 2
Fig. 3