


IfyouareinstallingthislightxtureonaHunterOriginalCeilingFan,
refertothe“ForHunterOriginalCeilingFansOnly”section.
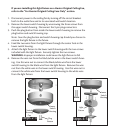
1. Disconnect power to the ceiling fan by turning off the circuit breakers
both to the outlet box and to its associated wall switch location.
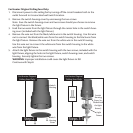
2. Remove the lower switch housing by unscrewing the three screws from
the upper switch housing. Disconnect the 9-pin plug connectors.
3. Push the plug button from inside the lower switch housing to remove the
plug button and switch housing cap.
Note: Save the plug button and switch housing cap should you choose to
remove the light fixture in the future.
4. Feed the two wires from the light fixture through the center hole in the
lower switch housing.
5. Attach the light fixture to the lower switch housing with the two screws
included with the light fixture. Securely tighten the two screws.
WARNING: Improper installation could cause the light fixture to fall.
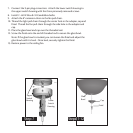
6. Remove the wire nut from the black/white wire in the lower switch hous-
ing. Use this wire nut to connect the black/white wire from the lower
switch housing to the black wire from the light fixture. Remove the wire
nut from the white wire in the lower switch housing. Use this wire nut to
connect the white wire from the lower switch housing to the white wire
from the light fixture.
Steps 2-3
Steps 4-5
Plug
Button
Switch
Housing
Cap
Lower
Switch
Housing
Lower
Switch
Housing
Light
Fixture