


8
HunterFanCompany 42641-01•09/13/07
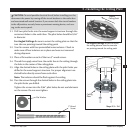
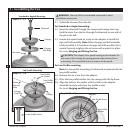
5 • Installing the Canopy and Canopy Trim Ring
WARNING: Failure to complete the following steps could cause the fan
tofall.
Note:Itisrecommendedyouuseamagnetictipscrewdriverforthe
followingsteps.
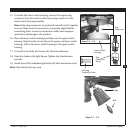
5-1.Rotatethehangerballsothetabinthecanopyissecureinthe
hangerballgroove.Note:Yourfanmayhavemultipletabsand
groovesthatmustbealigned.
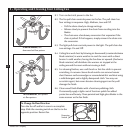
5-2. Swingthefanuptoalignthecanopyscrewholeswiththe
mountingholesontheceilingplate.
WARNING:eslotsinthecanopymustremainengagedwhile
swingingthecanopyforalignment.
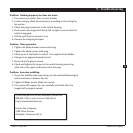
5-3. Holdingthecanopyupwiththescrewholesaligned,partially
install two canopy screws into the holes opposite the ceiling plate
tabs.
5-4. Partiallyinstallacanopyscrewbetweentheslotsinthecanopy.
Whenalltheholesareproperlyaligned,securelytightenallthree
canopyscrews.
5-5.Verifythatthetabsinthecanopyarestillinthegroovesofthe
hangerball.
5-6.Alignthetabsonthetrimringoppositethegroovesinthehanger
ball.Usingbothhands,pushthecanopytrimringuptothetopof
thecanopy.ecanopytrimringwillsnapandlockintoplace.
Note:Shouldyouneedtoremovethetrimring,pressrmlyon
oppositesidesofthetrimringdirectlyabovethegrooveinthe
hangerball.etabswillexoutreleasingthecanopytrimring.
Step 5-1
Step 5-2
Groove
Tab
Step 5-3
Canopy Screw
Canopy
Trim
Ring
Canopy