


7
41556-01 8/08/03 © 2003 HUNTER FAN CO.
Lubrication
Once properly installed, your fan needs little
attention, beyond checking the oil level. The oil is
checked by unscrewing and removing the oil hole
screw. If oil comes out of the hole, the oil level is
within proper levels.
If no oil comes out, complete the following
steps:
• Reinstall the oil hole screw.
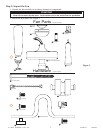
• Remove one blade iron/blade assembly from
the motor housing by uninstalling the two blade
armature screws.
• Rotate the motor so that the open area where
the blade iron/blade assembly you just removed is
directly above the oil hole screw. This is done so
that there is enough room to properly position the
tube of oil when refilling.
• Complete the steps in STEP 6: LUBRICA-
TION to properly complete adding oil into the
motor.
Cleaning
Take care when cleaning your fan. Never use
an abrasive cleanser or brass polish. Use a damp
cloth or sponge. Do not drip water or soap into the
motor.
Blades should be wiped clean periodically to
prevent dust buildup. Be careful not to bend the
blade irons.
If blades are cracked or blade irons bent, do not
attempt to repair them. Order replacement parts
from your Hunter dealer.
Installation on Pitched Ceilings
Your Hunter Fan can be mounted onto a
pitched ceiling (up to 34 degrees) using the same
method as mounting on a flat ceiling, except that the
hanger bracket and bushing must be aligned so they
are pointing up the sloped of the ceiling. You will
also need an extension pipe, which is available from
your Hunter dealer.
Care and Maintenance
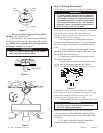
Figure 18
Hanger Bracket
(Furnished with Fan)
Expansion
Shield Anchor
Set Flush with
Ceiling
(Anchor Not
Furnished)
Concrete
Ceiling
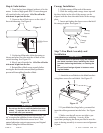
Refer to Figure 18 for the steps below.
• For concrete mounting, the drilled hole must be
recommended by the manufacturer of the anchor and it
must be drilled at least 1/2” deeper than the length of
the anchor.
NOTE: The drilled hole is usually marked on the anchor.
!
CAUTION
!
• Before performing any maintenance on the fan,
disconnect the power to the fan.
!
CAUTION
!
• Your Hunter ceiling fan weighs up to 50 lbs. The
following precautions must be taken for safety,
and to ensure that your fan is securely mounted
to the ceiling.
• The holes must be made with a suitable
carbide-tipped masonry drill bit.
• The anchors must be new and unused.
• The concrete ceiling must be sound and free
of cracks or voids in the vicinity of the mounting
holes.
• The anchors must be set in flush with the
surface of the concrete.
• The bracket screws must never be backed
out. If the bracket screws can be turned easily (by
hand), do not hang the fan.
Installation
1. Drill holes 2” deep in concrete ceiling to
receive 1/4” x 1-1/2” expansion shield anchor,
“Rawl No. 1055” or equal. (Not furnished.)
2. Install shield in holes, observing all cautions
above.
3. Proceed with the installation of the fan per
the basic installation instructions.
Installation in Concrete Ceilings