


Page 13 — English
MAINTENANCE
WARNING:
When servicing, use only identical replacement parts.
Use of any other parts may create a hazard or cause
product damage.
WARNING:
Always wear eye protection with side shields marked to
comply with ANSI Z87.1. Failure to do so could result in
objects being thrown into your eyes resulting in possible
serious injury.
WARNING:
Before inspecting, cleaning or servicing the machine, shut
off engine, wait for all moving parts to stop, and discon-
nect spark plug wire and move it away from spark plug.
Failure to follow these instructions can result in serious
personal injury or property damage.
GENERAL MAINTENANCE
Avoid using solvents when cleaning plastic parts. Most
plastics are susceptible to damage from various types of
commercial solvents and may be damaged by their use.
Use clean cloths to remove dirt, dust, lubricant, grease, etc.
WARNING:
Do not at any time let brake fluids, gasoline, petroleum-
based products, penetrating lubricants, etc., come in
contact with plastic parts. Chemicals can damage,
weaken or destroy plastic which could result in serious
personal injury.
Only the parts shown on the parts list are intended to be
repaired or replaced by the customer. All other parts should
be replaced at an authorized service center.
Before running the engine, perform the following pre opera-
tion steps:
Check that all bolts, nuts, etc., are securely tightened.
Make sure the air filter is clean.
Check both the engine lubricant level and the fuel tank
level; refill as needed.
Inspect the work area for hazards.
If there is excessive noise or vibration, stop the unit
immediately.
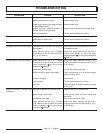
NOZZLE MAINTENANCE
See Figure 21.
Excessive pump pressure (a pulsing sensation felt while
squeezing the trigger) may be the result of a clogged or
dirty nozzle.
Turn offthe pressurewasherand shutoff thewater
supply. Pull trigger to release water pressure.
Removethenozzlefromthespraywand.
NOTE: Never point the spray wand at your face.
Usingastraightenedpaperclipornozzlecleaningtool
(not provided), free any foreign materials clogging or
restricting the nozzle.
Usingagardenhose,flushdebrisoutofnozzlebyback
flushing (running the water through the nozzle backwards
or from the outside to the inside).
Reconnectthenozzletothespraywand.
Turnonthewatersupplyandstarttheengine.
CLEANING THE AIR FILTER
See Figure 22.
A dirty air filter will cause starting difficulty, loss of
performance, and shorten the life span of the engine. Check
the air filter monthly. For best performance, replace the air
filter at least once a year.
Push the tabs on the air filter cover to open, then remove
the air filter cover.
Lift the edge of the air filter carefully and pull it out.
Brush the air filter lightly to clean.
Reinstall the air filter.
NOTE: Make sure the filter is seated properly inside the
cover. Installing the filter incorrectly will allow dirt to enter
the engine, causing rapid engine wear.
Reinstall the air filter cover.
CHECKING SPARK PLUG
See Figure 23.
Clean the area around the base of the spark plug before
removing to keep dirt and debris out of the engine. Re-
move spark plug.
Clean off carbon deposits on the spark plug electrode us-
ing a plug cleaner or wire brush. Replace the plug if worn.
(Recommended spark plug: NGK BPRGE5 or equivalent.)
Check electrode gap. The gap should be .028 in. - .032 in.
(0.7 mm - 0.8 mm). Adjust the gap, if necessary, by care-
fully bending the ground electrode.
Reinstall spark plug. Tighten securely.
CHANGING ENGINE LUBRICANT
See Figure 24.
Shut off the engine.
Clean the area around the oil cap/dipstick, then remove
the oil cap/dipstick.
Tilt the pressure washer on its side as shown. Drain lu-
bricant into approved container.