


Page 9 — English
OPERATION
WARNING:
Do not allow familiarity with this product to make you
careless. Remember that a careless fraction of a second is
sufficient to inflict serious injury.
WARNING:
Always wear eye protection marked to comply with
ANSI Z87.1. Failure to do so could result in objects be-
ing thrown into your eyes, resulting in possible serious
injury.
WARNING:
Do not use any attachments or accessories not recom-
mended by the manufacturer of this product. The use of
attachments or accessories not recommended can result
in serious personal injury.
WARNING:
Never direct a water stream toward people or pets, or
any electrical device. Failure to heed this warning could
result in serious injury.
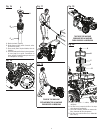
APPLICATIONS
Youmayusethisproductforthepurposeslistedbelow:
Removing dirt and mold from decks, cement patios, and
house siding
Cleaning cars, boats, motorcycles, outdoor furniture, and
grills
ADDING/CHECKING ENGINE LUBRICANT
See Figure 9.
NOTE: This machine has been shipped with approximately
2 oz. of lubricant in the engine from testing. You must add
lubricant to the engine before starting it the first time.
CAUTION:
Any attempt to start the engine without adding lubricant
will result in engine failure.
To add engine lubricant:
Place pressure washer on a flat, level surface.
Unscrew the oil cap / dipstick by turning counter-
clockwise.
Using 4-stroke engine lubricant (SAE 30 or SAE 10W30),
fill to the upper level of the oil filter neck (18 oz., 4-cycle
engine lubricant provided).
NOTE: We recommend you use ONLY Homelite or G-OIL
®
in your product.
Replace the oil cap / dipstick and securely tighten.
NOTE: This engine has a total lubricant capacity of
0.63 qt.
To check engine lubricant level:
Set engine on a flat surface.
Wipe dipstick clean and re-seat in hole; do not
rethread.
Remove dipstick again and check lubricant level. Lubricant
level should fall within the hatched area on the dipstick.
If level is low, add engine lubricant until the fluid level
rises to the upper portion of the hatched area on the
dipstick.
Replace and secure the oil cap/dipstick.
CAUTION:
Do not overfill. Overfilling the crankcase may cause ex-
cessive smoke and engine damage.
ADDING GASOLINE TO THE FUEL TANK
See Figure 10.
WARNING:
Gasoline and its vapors are highly flammable and
explosive. To prevent serious personal injury and prop-
erty damage, handle gasoline with care. Keep away from
ignition sources, handle outdoors only, do not smoke
while adding fuel, and wipe up spills immediately.
When adding gas to the pressure washer, make sure the unit
is sitting on a flat, level surface. If the engine is hot, let the
pressure washer cool before adding gas. ALWAYS fill the
fuel tank outdoors with the machine turned off.
NOTE: Use unleaded gas only. DO NOT mix lubricant with
gas.
Before removing the fuel cap, clean the area around it.
Remove the fuel cap.
Insert a clean funnel into the fuel tank then slowly
pour gasoline into the tank. Fill tank to approximately
1-1/2 in. below the top of the tank neck (this allows for
fuel expansion).
Replace fuel cap and tighten until the cap “clicks”.
Clean up any spills before starting the engine.
OXYGENATED FUELS
DO NOT USE E85 FUEL. IT WILL VOID YOUR WAR-
RANTY.
NOTE: Fuel system damage or performance problems re-
sulting from the use of an oxygenated fuel containing more
than the percentages of oxygenates stated previously are
not covered under warranty.
Ethanol. Gasoline containing up to 10% ethanol by volume
(commonly referred to as E10) or 15% ethanol by volume
(commonly referred to as E15) are acceptable. E85 is not.