


14
101473
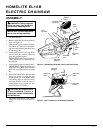
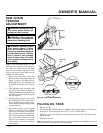
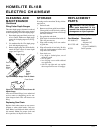
ELECTRIC CHAINSAW
HOMELITE EL18B
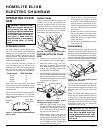
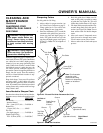
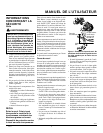
Flat File
Depth
Gauge
Tool
Figure 22 - Depth Gauge Tool On Chain
ECSp005
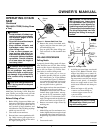
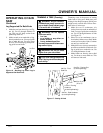
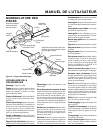
Figure 23 - Round Off Front Corner Of
Depth Gauge
Front Corner
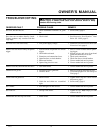
After several hand filings, have authorized
service center or sharpening service ma-
chine sharpen chain. This will insure even
filing.
Filing Cutter Depth Gauges
The cutter depth gauge clearance is reduced
as cutters are sharpened. After every second
or third sharpening, reset cutter depth gauges.
1. Place depth gauge tool firmly across top
of two cutters. Make sure depth gauge
enters slot in depth gauge tool (see Fig-
ure 22).
2. Use medium flat file. File depth gauge
level with depth gauge tool.
3. Remove depth gauge tool. With flat file,
round off front corner of cutter depth
gauge (see Figure 23).
Depth Gauge
Depth
Gauge
Slot
STORAGE
If storing saw for more than 30 days, follow
steps below.
1. Drain oil tank.
2. Remove and clean guide bar and chain.
Clean guide bar and chain by soaking
in petroleum based solvent or mild soap
and water mixture.
3. Dry guide bar and chain.
4. Place chain in container filled with oil.
This will prevent rust.
5. Wipe a thin coating of oil over surface
of guide bar.
6. Wipe off outside of saw body. Do this
with soft cloth dampened with a mild
soap and water mixture.
7. Store chain saw
• in a high or locked place, out of
children’s reach
• in a dry place
• in a carrying case or with scabbard
over guide bar
• with oil cap tight and saw upside
down to prevent excess oil seepage
Replacing Saw Chain
Replace chain when cutters are too worn to
sharpen or when chain breaks. Only use
Dual Raker low-kickback chain noted in
this manual.
Note:
For proper chain and
drive sprocket, see Replacement Parts.
REPLACEMENT
PARTS
WARNING: Use only replace-
ment parts described in this
manual. Use of other parts could
damage saw or injure operator.
Purchase these parts from your local dealer.
Part Number Description
NE-16001-G7 Guide bar,
400 mm (16")
H1-N7255-AH Saw Chain
(Type 35-MD50-55)
075752 Drive sprocket
CLEANING AND
MAINTENANCE
Continued