


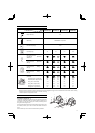

6
NOTE
When it is hard to insert drive shaft up to the marked position on
the drive shaft tube, turn drive shaft by the cutter mounting end
clockwise or counter-clockwise. Tighten tube locking bolt lining
up the hole in the shaft tube. Then tighten clamp bolt securely.
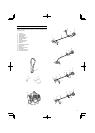
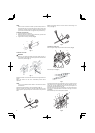
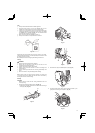
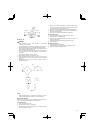
Installation of attachment
1. Join the attachment in place of it.
2. Make sure the lock pin (3) fi ts in the location hole (4) of tube and
that the tube will not come off . (Fig. 2)
3. Tighten the knob nut (5) securely. (Fig. 2)
3
5
4
Fig. 2
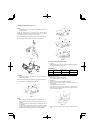
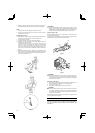
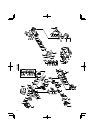
Installation of handle
WARNING
When you use steel/rigid blades on straight shaft trimmers or
brush cutters, always use a barrier bar (6) and shoulder harness
with the loop handle. (Fig. 3)
6
Fig. 3
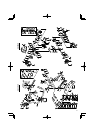
Attach the handle to the drive shaft tube with the angle towards the
engine.
Adjust the location to the most comfortable position before
operation.
NOTE
If your unit has handle location label on drive shaft tube, follow
the illustration.
Remove the handle bracket (7) from the assembly. (Fig. 4)
Place the handles and attach the handle bracket with four bolts
lightly. Adjust to appropriate position. Then attach it fi rmly with the
bolts.
7
Fig. 4
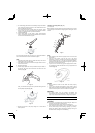
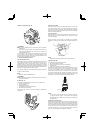
Attach the protection tube to the drive shaft or handle using cord
clamps (8). (Fig. 5)
8
Fig. 5
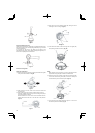
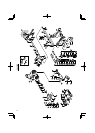
Throttle wire / stop cord
Press the upper tab (9) and open the air cleaner cover. (Fig. 6)
9
Fig. 6
Connect stop cords. (Fig. 7)
Fig. 7
If the throttle outer end (10) is threaded on your unit, screw it and the
earth terminal (11) (if so equipped) into the cable adjuster stay (12)
all the way, and then tighten this cable end using the adjuster nut
(13) against the cable adjuster stay (12).
Connect throttle wire end (14) to carburetor (15) and install swivel
cap (16) (if so equipped) where is included in tool bag, onto swivel
(15) (Fig. 8).
Some models may come with the parts installed.
15
13
16
12
11
10
14
Fig. 8