


33
4) Put a load equal to the desired actuation point on the hoist's hook (do not exceed 125% of the hoist's
rated capacity). Begin to slowly lift the load, then increase the lifting speed. Return the load to its
resting position so the load chain is not under tension.
5) If the load limiter prevents lifting, turn the adjustment screw IN one full turn.
6) Repeat steps 4 and 5 until the load limiter allows lifting.
7) Turn the adjustment screw OUT ¾ of a turn.
8) Attempt to lift the rated capacity load again, beginning slowly, then increasing the lifting speed.
9) If the load limiter does not allow lifting, then turn the adjustment screw IN ¼ turn.
10) Repeat steps 8 and 9 until the load limiter allows lifting.
11) Turn the adjustment screw IN ¼ turn. Then, while holding the adjustment screw, tighten the lock nut to
secure the setting.
7.2 Brake
7.2.1 For Load Brake setup and adjustment procedure consult factory.
7.2.2 Inspect the brake disc in accordance with Section 5.7, Table 5-3.
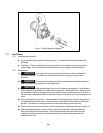
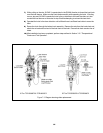
7.2.3 The following is the hoist brake inspection procedure. Refer to Figure 7-2.
1)
WARNING
HAZARDOUS AIR PRESSURE IS PRESENT IN THE HOIST, IN THE
SUPPLY OF COMPRESSED AIR TO THE HOIST, AND IN THE CONNECTIONS BETWEEN
COMPONENTS. Shut off the air supply and stop the airflow completely. Lock out and tag out in
accordance with ANSI Z244.1 “Personnel Protection -Lockout/Tagout of Energy Sources”.
2) Do NOT turn or remove the brake adjustment screw located in the center of the brake cover.
3) Gradually back out all four hex socket cap screws from brake cover to slowly decrease spring
tension of brake piston against brake disc.
4) Remove brake cover from the motor housing top of gear case. Keep brake piston, springs, seals,
etc. together inside the brake cover.
5) Remove brake disc for inspection and measurement. Refer to "Motor Brake" in Table 5-3, "Hoist
Inspection Methods and Criteria".
6) Prior to reassembly, clean all surfaces of debris, dirt and loose paint.
7) Reassemble in reverse order. Torque all mounting hardware evenly during the reassembly
process.