


SKU 99621 For technical questions, please call 1-800-444-3353. Page 5
How to Attach to your ATV
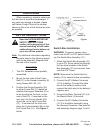
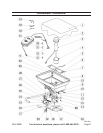
Place the ATV Spreader (assembled), 1.
centered on the front, or rear luggage
rack of your ATV. Use the J-Bolts
(34), Press Plate (33) and Hex Nuts
(32) to connect Frame Rail (21) to the
luggage rack cross bar closest to the
seat, or handlebars. Use the J-Bolts
(34), Press Plate (33) and Hex Nuts
(32) to attach the Spreader to the
luggage rack, securing it to the outer
most rail on the luggage rack.
WARNING:2. Prior to each use, inspect
the mounting hardware and the ATV
Spreader to ensure the tightness of
the mount. If any hardware is loose,
tighten securely before using the unit.
Functions
This ATV Spreader can be used to 1.
spread grass seed, fertilizer pellets,
sand, ice-melt and any other type of
seed or loose pellet type lawn care
products.
NOTE:2. Not for powdered lawn prod-
ucts which are hard to adjust spread
rates, or for heavy, mulch-type prod-
ucts which will clog the Turning Plate
(16).
OPERATING INSTRUCTIONS
Read the ENTIRE IMPORTANT
SAFETY INFORMATION section
at the beginning of this manual
including all text under
subheadings therein before set
up or use of this product.
Before operating the ATV Spreader, 1.
put on ANSI-approved safety goggles
and other safety gear (not supplied).
An Adjustable Solid Stop is provided 2.
to allow the operator to adjust the
Gauge Assembly (22) to the desired
opening, allowing the correct amount
of material to fall onto the Turning
Plate (16) for disbursement. The
“Solid Stop” will allow the operator to
repeat the opening/closing without
having to look at the control while op-
erating the vehicle. It is set by using
the Thumb Wing Nut (24) located on
the Gauge Assembly (22). Establish
the correct opening, then lock down
the Thumb Wing Nut (24).
Measure off a distance of 50 feet on 3.
the surface you will be working. See
number 9 below.
Weight out enough of the material to 4.
ll the Hopper Assembly (8) at least
half full. Record the weight for further
use.
Set the Adjustable Solid Stop on the 5.
Gauge Assembly (22) to the desired
opening and tighten the Thumb Wing
Nut (24).
NOTE:6. Usually an approximate
spreading rate is listed in material di-
rections, or on the bag of the specic
material you will use.
As you start driving the ATV through 7.
the work area, open the Control
Handle (25) till it stops against the
Adjustable Solid Stop.
Continue to spread the material till 8.
you cross the end of the area you are
working. Close the Control Handle
(25) to stop the ow of material onto
the Turning Plate (16).