


SKU 92281 For technical questions, please call 1-800-444-3353. PAGE 11
ASSEMBLY INSTRUCTIONS
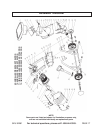
NOTE: For additional information regarding the parts listed in the following pages, refer
to the Assembly Diagram on page 17.
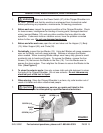
WARNING! Always make sure the Power Switch (47) of the Chipper/Shred-
der is in its “OFF” position and the unit is unplugged from its electrical outlet
prior
to assembling the unit, unclogging the unit, or making any adjustments to the unit.
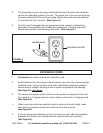
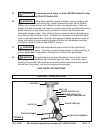
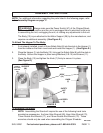
The Body (13) is pre-attached to the Motor Support (26) by the manufacturer, and
requires no additional assembly. (See Figure E.)
To Attach The Hopper To The Body:
1. If not already installed, insert all three Safety Nuts (8) into the slots in the Hopper (1)
from the inside so that their round ends are inside the Hopper (1). (See Figure E.)
2. Place the Hopper (1) into the Body (13), lining up the Safety Nuts (8) with the slots in
the Body. Secure the Hopper in place using Washers (9 & 10) and Screws (11).
3. Close the Body (13) and tighten the Knob (7) firmly to secure it in place.
(See Figure E.)
To Assemble The Stand:
1. NOTE: Assembling the Stand will require the use of the following hand tools
provided as accessories; the 5mm Allen Wrench (69), 6mm Allen Wrench (70),
13mm Double End Wrench (71), and 16mm Double End Wrench (72). These
wrenches should only be used when assembling the Chipper Shredder.
BODY
(13)
HOPPER
(1)
MOTOR
SUPPORT
(26)
KNOB
(7)
FIGURE E
SAFETY
SHUT-OFF
SWITCH
(42)
HOPPER
(1)
SAFETY
NUT
(8)
REV 04/05