


Connect
To
Water Supply
-CAUTION
plumbing codes regarding cross-connection to
water supply. Optional backflowpreventorP/N
801-1
33
is available to prevent the back-up of
Do
not exceed
1
GOOF
(70'C) water temperature to
pump in
a
direct supply system.
from your city water supply to the units
3/d
inch
Connect
a
hose with at least
3/4
inch
(19
mm)
I.D.
garden hose threaded inlet. The supply hose should
not be longer than
50
feet
(15
m)
long.
~~
NOPE:
For
a
direct supply system, your wafer
source at the unit must have
a
flow
rate of
at
least
4
GPM
(1
5
liter/min).
Electrical Service
electrical receptacle be sure that the electrical
Before plugging the sprayer into
an
approved
service is single phase,
115
V,
60
Hz
AC.
15
Amp,
With the motor control switch
in
the
OFF
position,
extension cord
is
used, be sure that
it
has
a
ground
plug the power cord into
a
grounded outlet. If an
and that the wire gage is at least
No.
14
gage wire.
The cord should not be over
100
feet
(30
m) long.
See
the operation section for further characteristics on
the motor control switch,
OPERATION
startup
and startup instructions.
Before starting, be sure to read the safety warnings
Turn
.on the water supply
Trigger the gun to release any back pressure
~~~~~~~
DO
NOT wire or tie the gun trigger into the open
or triggered position.
CAUTION
-
Never run the cleaning unit dry.
Costly
damage
to the pump will result. Always be sure water
supply is completelyturned on before operating.
Inspect
all
connections for any leaks. Tighten if
necessary.
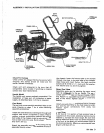
Motor,Control Switch
As indicated earlier
in
this manual the motor control
switch has
a
built in ground fault interrupter circuit.
Due
to this special protection feature of the switch, if
the
switch
"ON"
button
is
pushed in while the
unit
is
unplugged, the unit will go into the
"ON"
mode.
switch cannot be turned off
until
it
isenergized. Once
When
plugged in, unit
will immediately start. The
power
is
applied to unit,
switch can be turned off.
NOTE:
Always
use
the motor control switch
when starting and stopping unit. Avoid
when unit is unplugged.
inadvertently pushing
"ON"
button
Cleaning
.
switch and pushing the "START" button. This button
Start unit by lifting the cover on the motor control
is
also marked "RESET".
Pull
trigger on gun and unit
should
start
spraying.
The spray pattern can be changed by turning the
control ring on the adjustable spray nozzle.
.With the control ring turned completely counter-
clockwise (viewed from front)
all
water pressure
will
position the normal spray pattern
of
15"
will take
be
directed through the spray tip orifice. In this
place.
To
change the spray pattern simply turn
the
control
ring clockwise. This will cause
a
drop
in
pressure
which
will
activate the downstream chemical
injector.
When full strength spraying
is
desired, turn control
ring counterclockwise
to
closed position.
DO
NOT
attempt to adjust nozzle when spray
~A~~~~~~
gun
is
in the
ON
position before adjusting.
gun
is
in
use.
Be
sure that the safety latch on
Pressure Adjustment
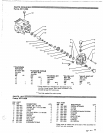
The pressure washer has been factory adjusted to
deliver
800
k25
PSI (measured
at
the pump outlet).
This
is
the maximum pressure that this unit
is
decreased by turning the control knob located on the.
designed for. However, this pressure can be
Turning the control knob
in
a clockwise direction
unloader valve on 'the
outlet
side of the pump.
(viewed from above the unit) will gradually decrease
the output pressure and flow.
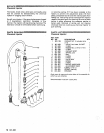
A downstream chemical injector is provided with the
Chemical Injector
attached with clear tubing
to
chemical injector into
pressure washer. Insert chemical filter that is
the top of the desired chemical container.
The chemicals used must be compatible with system
components. The standard spray hose
is
made of
'Buna-N rubber, and the chemical injector is brass.
~
Observe chemical manufacturer's safety pre-
WI&3N8M'G
cautions regarding
use
of goggles, protective
clothing or respirators.
L