


8 9
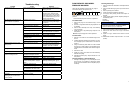
INSTALLATION & PREPARATION
INSTRUCTIONS
Engine Fuel Tank
Review “Fire & Ventilation Precautions” pg. 4, before
fueling.
Locate the Safety Decals on your unit and heed their
warnings.
A minimum of 86 octane fuel is recommended for use
with this unit. Do not mix oil with gasoline.
Purchase fuel in quantities that may be used within 30
days. Use of clean, fresh lead free gasoline is recom-
mended. Leaded gasoline may be used if lead-free is
unavailable. Do not use gasoline containing methanol
or alcohol.
Check the engine oil level before starting the engine.
(See engine manual.)
Fill the fuel tank according to accompanying engine
manual instructions.
Occasional carburetor and choke adjustments will be
necessary for the engine. Refer to the engine manual
supplied with this unit for proper adjustment proce-
dures.
Review the engine manual accompanying this pressure
washer for correct engine start-up and maintenance
procedures.
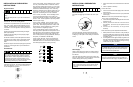
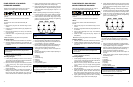
Nozzle Review
Various nozzles may be quick-connected into the end
of the wand to change the spray pattern or use the
detergent feature. When using Quick Connects (Q.C.),
be certain the connection is securely locked. If not,
the high pressure water may shoot the nozzle from the
wand, causing severe injury or serious damage.
To determine spray fan, refer to the actual number
stamped on the nozzle. The rst two digits indicate the
spray fan in degrees, i.e.; 0=0°, 15=15°, 25=25°, 40 =
40°, 65=detergent/low pressure.
The 0° nozzle (RED): This is a blasting nozzle. It deliv-
ers a very concentrated stream of water. Be cautious
when using the straight narrow stream. It is not recom-
mended for use on painted or wood surfaces, or items
attached with adhesive backings. Uses: Removing
weeds from sidewalk cracks, stubborn stains from con-
crete, masonry, aluminum and steel, caked mud from
equipment, and cleaning lawn mower undersides.
The 15° nozzle (YELLOW): This is a chiseling nozzle.
The spray should be directed at a 45° angle to the
surface and used like a scraper to remove paint, grease
and dirt. Uses: Surface preparation (removing mildew
stains and paint chips).
The 25° nozzle (GREEN): This is a ushing nozzle.
This pattern is best suited for ushing dirt, mud, and
grime. Uses: Wet sweeping leaves from walks, curbs
and driveways, cleaning stable oors, washing swim-
ming pool bottoms, degreasing engines.
The 40° nozzle (WHITE): This is a wash nozzle. This
wide spray pattern disperses the water pressure over a
large area and is recommended for moderate washing.
Uses: Washing down aluminum siding, cleaning win-
dows, washing vehicles, spraying sidewalks, driveways
and patios. (not available for Model 2525)
The 65° nozzle (BLACK): This is a low pressure de-
tergent application nozzle. This broad spray pattern
distributes solution over vast areas under low pressure.
Uses: Detergent application, misting or rinsing.
INSTALLATION & PREPARATION
INSTRUCTIONS
Nozzle Connection
Be certain the trigger gun is locked in the “OFF” posi-
tion.
The nozzle assembly should be disconnected from
the gun/wand assembly at this time by retracting the
locking ring on the quick-connect tting to remove the
nozzle.
Water Supply
Select a water supply hose which is a quality grade of
garden hose measuring at least 3/4” ID and no longer
than 50 feet.
Check the water inlet strainer to ensure it is clean and
free of any obstructions. Periodic cleaning of the water
strainer will help prevent pump problems.
NOTICE
As a strainer becomes obstructed, it restricts proper
ow of water to the pump. This can result in cavita-
tions which will cause premature failure of pump
packings.
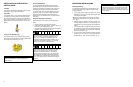
1. Using a screw driver, remove the screen from the water
inlet.
2. Clean or replace if necessary.
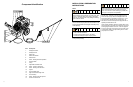
Connect the hoses.
1. Connect one end of the water supply hose to the water
inlet of the unit.
2. Connect the other end of the hose to your pressurized
water supply.
Note: Do not use a non-pressurized water supply (i.e.
from a pond or well) with this unit.
3. Connect the high pressure discharge hose to the water
outlet of the unit.
4. Securely connect the other end of the hose to the
gun assembly. (A wrench may be required on some
models.)
5. Connect the wand assembly to the gun/hose
assembly.
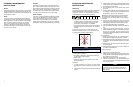
Follow the incoming water requirements listed below:
1. Water pressure must be a minimum of 25 pounds per
square inch (PSI) and a maximum of 125 PSI. (A typical
outdoor faucet will generally supply this PSI if turned
completely “ON”.)
2. Incoming GPM must be approximately one gallon more
than the outgoing GPM stated on the pressure washer
nameplate. (You can check GPM by timing how long
it takes to ll a 5 gallon container.)
NOTICE
Incoming water temperature must not exceed 125°F
for Model 2525, and 145°F for other models. Exces-
sive pump damage may result if the water tempera-
ture exceeds this acceptable level.
NOTICE
Damage to the equipment could occur. Never allow
the unit to operate without the incoming water line
attached and the water supply completely turned on.