


10000EXL Extended Life Generator
4
Your generator requires some assembly and is ready for
use after it has been properly serviced with the
recommended oil and fuel.
If you have any problems with the assembly of your
generator, please call the generator helpline at
1-800-270-1408.
IMPORTANT: Any attempt to run the unit before it has
been serviced with the recommended oil will result in an
engine failure.
REMOVE GENERATOR
FROM CARTON
• Set the palleted carton on a rigid flat surface.
• Carefully cut bands around the shipping carton.
• Lift carton off the generator.
• Remove all packing material, carton fillers, etc.
• Remove the generator from the shipping pallet.
INSTALL WHEEL KIT
The wheel kit is designed to greatly improve the portability
of your generator.
NOTE:Wheel kit is not intended for over-the-road use.
You will need a socket wrench with 1/2" or 13mm sockets
and a needle-nose plier to install this kit.
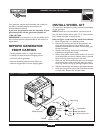
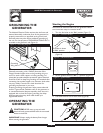
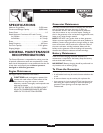
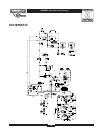
Refer to Figure 1 and install the wheel kit as follows:
1. Place the generator on a hard flat surface.
2. Stand at the control panel end of the generator and
gently tilt the generator up, high enough to place
wooden blocks beneath the cradle.This will allow you
to add the wheels.
3. Slide the axle through the holes in the brackets
provided on the generator cradle.
4. Slide a wheel spacer, wheel and flat washer on one end
of the axle. Make sure the air inflation valve is outward.
Place the e-ring onto the groove in the axle.
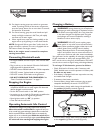
5. Place one end of the needle nose pliers on the bottom
of the axle and the other end of the pliers on top of
the e-ring. Seat the e-ring by pressing the pliers closed.
6. Slide the axle through until wheel is tight against bracket.
7. Install the e-ring on the other side in the same manner
as steps 4 & 5. Remove the wooden blocks.
Support Leg
Flat Washer
Axle
20mm Cap Screw
Hex Nut
Wheel
E-Ring
Figure 1 — Install Wheel Kit
30mm
Cap
Screw
Flat
Washer
Vibration
Mount
Lock Washer
Wheel Spacers