


17
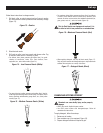
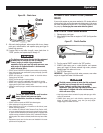
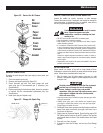
Figure 32 – Service the Air Cleaner
Paper
Filter
Element
Air
Cleaner
Cover
Foam
Filter
Element
Gasket
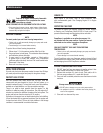
SERVICE SPARK PLUG
Changing the spark plug will help your engine to start easier and
run better.
1. Clean area around spark plug.
2. Remove and inspect spark plug (Figure 33).
3. Check electrode gap with wire feeler gauge and reset
spark plug gap to recommended gap if necessary (see
Specifications).
4. Replace spark plug if electrodes are pitted, burned or porcelain
is cracked. Use the recommended replacement plug. See
Specifications.
5. Install spark plug and tighten firmly.
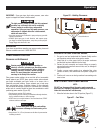
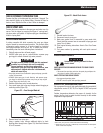
Figure 33 – Change the Spark Plug
SPARK PLUG
0.028-0.031
in
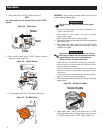
INSPECT MUFFLER AND SPARK ARRESTER
Inspect the muffler for cracks, corrosion, or other damage.
Remove the spark arrester, if equipped, and inspect for damage or
carbon blockage. If replacement parts are required, make sure to
use only original equipment replacement parts.
Contact with muffler area can result in serious
burns. Exhaust heat/gases can ignite
combustibles, structures or damage fuel tank
causing a fire.
• DO NOT touch hot parts and AVOID hot exhaust gases.
• Allow equipment to cool before touching.
• Keep at least 5 feet (152 cm) of clearance on all sides of power
washer including overhead.
• It is a violation of California Public Resource Code, Section 4442,
to use or operate the engine on any forest-covered, brush-covered,
or grass-covered land unless the exhaust system is equipped with
a spark arrester, as defined in Section 4442, maintained in effective
working order. Other states or federal jurisdictions may have similar
laws.
Contact the original equipment manufacturer, retailer, or dealer to
obtain a spark arrester designed for the exhaust system installed
on this engine.
• Replacement parts must be the same and installed in the same
position as the original parts.
AFTER EACH USE
Water should not remain in the unit for long periods of time.
Sediments or minerals can deposit on pump parts and freeze pump
action. Follow these procedures after every use:
1. Shut off engine, turn off water supply, point gun in a safe
direction, and squeeze trigger to relieve trapped pressure, and
let engine cool.
The high pressure stream of water that this equipment
produces can cut through skin and its underlying
tissues, leading to serious injury and possible
amputation. Spray gun traps high water pressure, even
when engine is stopped and water is disconnected,
which can cause injury.
• Keep high pressure hose connected to pump and spray gun while
system is pressurized.
• ALWAYS point spray gun in safe direction and squeeze spray
gun trigger, to release high pressure, every time you stop engine.
Engage trigger lock when not in use.
2. Disconnect hoses from spray gun and high pressure outlet on
pump. Drain water from hoses, spray gun, and lance. Use a
rag to wipe off the hose.
3. Empty pump of all pumped liquids. Check that the engine ON/
OFF switch and fuel valve are in the OFF position. Then pull the
recoil handle about six times. This should remove most liquid
in pump.
4. Store unit in a clean, dry area.
5. If storing for more than 30 days, see the Long Term Storage
section.
Maintenance