


1.1 UNPACKING
Remove all packaging material.•
Remove separate accessory box.•
Remove carton off the generator.•
1.1.1 ACCESSORY BOX
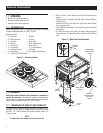
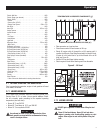
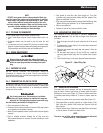
Check all contents (Figure 1). If any parts are missing or damaged
locate an authorized dealer at 1-888-775-6937.
Contents include:
2 – Axle Pins • Oil Filter•
2 – Wheel Spacers • Air Filter •
2 – Hair Pins • Spark Plug•
2 – Wheels • Spark Plug Wrench•
1 – Frame Foot • Shop Towel•
2 – Frame Bolts • 2 – Frame Washers•
2 – Vibration Mounts • Oil Funnel•
4 – Flange Nuts 12 Volt Adaptor Plug Charger•
2 – 1 Quart SAE 30 Oil Bottles•
Figure 1 – Accessory Boxes
1.2 ASSEMBLY
Read entire Owner's Manual before attempting to assemble or
operate the generator. The generator requires some assembly
prior to using it. If problems arise when assembling the generator,
please call the Generator Helpline at 1-888-775-6937.
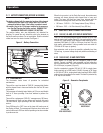
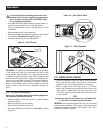
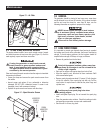
1.2.1 ASSEMBLING THE WHEEL KIT AND FRAME FOOT
The wheel kit is designed to greatly improve the portability of the
generator. You will need the following tools to install the wheel
kit: Pliers, 1/2" (13mm) wrench and a socket wrench with a 1/2"
(13mm) socket.
NOTE:
The wheel kit is not intended for over-the-road use.
Refer to Figure 2 and install the wheel kit and frame foot as •
follows:
Slide the Axle Pin through the Wheel, Wheel S• pacer (Washer)
and the Frame.
Install the Hair Pin to the Axle Pin to secure the wheel. Repeat •
for the opposite side.
Secure the Vibration Mounts to the Frame Foot with the included •
locking nuts.
To install the Frame Foot, install the Frame Bolts though the •
Frame Washers, Frame and Frame foot. Secure with the locking
nuts.
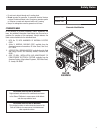
Figure 2 – Wheel and Foot Assembly
ASSEMBLE
FRAME
FOOT
SECURE WHEEL
AND AXLE WITH
HAIR PIN
SLIDE AXLE
THROUGH WHEEL
AND WHEEL
SPACER
WHEEL SPACER
(WASHER)
FRAME
BOLT
FRAME
WASHER
FLANGE
NUT
4
General Information