


Charging the Collar
NOTICE
To prevent corrosion, thoroughly dry the contacts on the collar
and the surrounding area before connecting the charging clip.
You should fully charge the battery before you use the device
for the first time or whenever the battery is low (Checking the
Battery Level). It is normal for the battery to discharge in
approximately 7 to 10 weeks when the device is not in use.
Charging a fully depleted battery takes about 2 hours.
NOTE: The device will not charge when outside the
temperature range of 32° to 104°F (0° to 40°C).
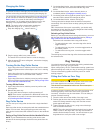
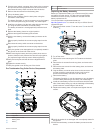
1
Snap the charging clip
À
onto the device
Á
.
2
Plug the power cable into a power source.
The status LED is solid red when the collar is charging.
3
After the status LED turns solid green, remove the charging
clip from the collar.
Turning On the Dog Collar Device
• On the dog collar device, hold the power key until the status
LED turns green and the collar beeps to turn it on in training
mode.
• On the dog collar device, hold the power key until the status
LED turns blue to turn on the BarkLimiter™ feature
(BarkLimiter).
• On the dog collar device, hold the power key until the status
LED turns yellow to enter pairing mode (Pairing a Dog Collar
Device with the Handheld Device).
Turning Off the Device
1
On the dog collar device, hold the power key until the red
LED appears.
2
Release the power key.
The dog collar device beeps to confirm powering off.
NOTE: If the device is powered off in BarkLimiter mode, the
LED flashes the number of corrected barks before powering
off (Checking the Bark Odometer).
Dog Collar Device
You can use up to 9 dog collar devices with a single handheld
device.
Each dog collar device must be paired with the handheld device
before it can be used. During the pairing process, each dog
collar device is associated with a different color on the handheld
device.
Pairing a Dog Collar Device with the Handheld Device
NOTE: If your handheld device and dog collar device were
included in the same package, the devices are paired from the
factory.
1
On the handheld device, move the toggle switch and select a
key to choose the color associated with the dog collar
device.
2
On the handheld device, set the intensity level to a
numbered position (Changing the Intensity Level).
3
On the dog collar device, hold the power key for about 5
seconds until the status LED changes to yellow.
4
On the handheld device, select a training key.
The dog collar device beeps when the devices have paired
successfully. If the device does not beep, pairing has not been
successful.
TIP: If the devices did not pair successfully, you should verify
the batteries in both devices are fully charged and the intensity
level is set to a numbered position.
Selecting a Dog Collar Device
Before you can select and control a dog collar device, you must
pair the dog collar device with the handheld device (Pairing a
Dog Collar Device with the Handheld Device).
Select the color associated with a dog collar device:
• To select the button color, move the dog collar device
toggle switch up.
• To select the inner ring color, move the toggle switch to
the middle position.
• To select the outer ring color, move the toggle switch
down.
The training keys control the dog collar device associated with
the selected color.
Dog Training
You should research and investigate the training methods best
suited for you, your dog, and your needs.
When used properly, the Pro Trashbreaker training system is an
effective training tool to aid your dog in reaching its full potential.
The use of the training system should be part of an overall
training program.
Fitting the Collar on Your Dog
CAUTION
To prevent irritation from the contact points, remove the collar
for at least eight hours out of every 24-hour period.
This device is not intended for human use. Do not attempt to
use on any person.
In order to properly correct the dog, the collar and device must
fit the dog properly. If the collar is too loose or positioned
incorrectly, corrections may be inconsistent. This can delay or
prevent successful training.
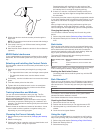
1
Place the collar around the middle of the dog's neck.
2
Position the device at the front of the dog's neck, with the
status LED facing toward the dog's chin and the contact
points against the throat.
3
Tighten the strap so that it is very snug around the dog's
neck, and fasten the buckle.
NOTE: The collar should fit tightly and should not be able to
rotate or slide on the dog's neck. The dog must be able to
swallow food and water normally. You should observe your
dog's behavior to verify the collar is not too tight.
2 Dog Training