


1110
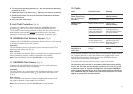
12. Faults
Fault Possible Cause Remedy
Not able to open the Battery power too low. Insert a new
Water Timer using alkaline battery.
the “On/Off-man.”
Tap turned off. Turn on tap.
function.
Watering not Battery power too low. Insert a new
initiated. alkaline battery.
Data input / changes Input data or make
made while the pro- changes before or
gram was starting or after the starting times
immediately before. you have chosen.
Tap turned off. Turn on tap.
Soil Moisture Sensor If dry, check setting/
or Rain Sensor indi- position of the Soil
cate sufficient moisture. Moisture Sensor or
Rain Sensor.
Battery flat after Not an alkaline Use an alkaline
working for a battery. battery.
short time.
If you have any problems with your Water Timer Electronic, please contact
our Customer Service or return the defective unit together with a short
description of the problem directly to one of the GARDENA Service
Centres listed on the back of this leaflet.
If covered under warranty, please include a copy of the receipt.
We expressly point out that, in accordance with the product liability
law, we are not liable for any damage caused by our units if it is due
to improper repair or if parts exchanged are not original GARDENA
parts or parts approved by us, and, if the repairs were not carried out
by a GARDENA Service Centre or an authorised specialist. The same
applies to spare parts and accessories.
.
The minimum operating pressure is 1 bar, the maximum operating
pressure is 12 bar.
.
Check the filter in the sleeve nut
7
regularly and clean if necessary.
.
Avoid tensile strain. Do not pull the hose connected to the Water
Timer Electronic.
.
Only use clear fresh water.
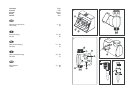
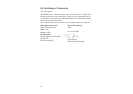
9. Anti-Theft Protection (Fig. D)
To protect your Water Timer against theft, the GARDENA anti-theft
protection
0
(1815-00.791.00) is available at GARDENA Service.
The bracket on the anti-theft protection is fitted onto the back of the unit.
Note that the screw included cannot
be loosened once it has been
screwed in. The bracket can be used, for example, to attach a chain.
10. GARDENA Soil Moisture Sensor (Fig. E)
Together with the GARDENA Soil Moisture Sensor (Art. No. 1187) watering
is controlled considering the soil moisture.
Assembly
The Soil Moisture Sensor is connected to the connection socket
6
on
the back of the control unit (Fig. A).
How it works
If the connected Soil Moisture Sensor indicates there is sufficient moisture
then the watering program is either interrupted or not initiated.
Note: Manual watering (function On/Off-man.) is still possible.
11. GARDENA Rain Sensor (Fig. F)
Together with the GARDENA Rain Sensor (Art. No. 1189) watering is
controlled considering natural precipitation.
Assembly
The Rain Sensor, as an alternative to the Soil Moisture Sensor, can be
connected to the connection socket
6
on the back of the control unit
(Fig. A).
How it works
If the connected Rain Sensor indicates an appropriate amount of rain,
the watering program is interrupted or not initiated.
Note: Manual watering (function On/Off-man.) is still possible.