


76
Adaptor for G 3/4 thread (26.5 mm)
The adaptor supplied allows the Water Timer to be connected to taps with
a G 3/4 thread (26.5 mm). If you are using the adaptor, screw the adaptor
onto the tap before screwing the Water Timer onto the adaptor.
Warning! Attach and screw on manually. Do not use pliers!
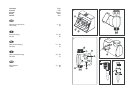
6.3 Function Keys and Display (Fig. C)
Not
e: The Water Timer control unit
1
can be removed (Fig. B). This allows
you to set the watering program somewhere other than where the Water
Timer is to be used.
Menu-O.K.
➔ Changes to the next stage of the program. Simultaneously accepts
and confirms the data you have entered using the man. key.
On/Off-man.
➔ Used to change the individual data (e.g. counting hours, minutes, ...)
➔ To switch a connected watering system on and off manually.
LCD Display
Note:
.
In the entry mode the corresponding display flashes.
.
At high temperatures (over 60 °C at the display) the LCD may extinguish.
This has no effect on the program sequence. Once the LCD display
cools down, the display will appear again.
On
Status display – The connected watering system is active.
Off
Status display – The connected watering system is inactive.
Time (current time)
➔ In the programming mode: Hours – Hours of the current time
Minutes – Minutes of the current time
Start
➔ Starting time; when the watering system becomes active.
Hours – Hour when devices become active
Minutes – Minutes when devices become active
Cycle
Displays selected program.
6.4 Programming
Entering the Current Data
1. Press the O.K. key
➔ the hours (Time) start flashing.
2. You can enter the time using the man. key, e.g. 9:00.
3. Use the O.K. key to confirm the hour you have entered and to allow
you to enter the minutes.
4. Select the minutes using the man. key, e.g. 23.
5. Confirm your entry by pressing the O.K. key and switch to the starting
time.
Entering the Starting Time
1. Use the man. key to enter the hours of the starting time, e.g. 7.
Then press the O.K. key to confirm your entry and to enter the minutes.
2. Once again, use the man. key to set the minutes of the starting time,
e.g. 30.
Confirm your entry by pressing the O.K. key.You can now choose your
program.
Active Program
1. Choose a program listed in the section “Program Overview”. Press the
man. key repeatedly until the program number you require appears on
the display.
Note: With the combination 00 (“Stand-by”) no program is active.
2. Confirm your selection by pressing the O.K. key.
➔ You have now successfully programmed your Water Timer. The current
time now appears on the display.
Note
.
You can jump to the next program level at any time during the program-
ming sequence by pressing the O.K. key (current time, starting time,
program number). The set data is then simultaneously accepted.
.
If you do not enter data within 120 seconds, you automatically leave
the programming mode and the LCD shows the current time (normal
display). Any changes you have made previously are applied.
.
You have now successfully programmed your Water Timer. Your garden
will now be watered automatically at the programmed times.
Display During Active Time
Example:
.
The current time is 8:45 am
.
On is lit; this means watering is in progress (active)
.
The double dots between the hours and minutes of the time are flashing;
this means the clock is running.