


8
(GB ) MAINTENANCE
Nylon Line
V
X
W
eyelet
hole in
spool
line
Do not depress the button more than three times.
Excessive line will snag the line cutter and cause
the trimmer to malfunction.
• Ensure spool is fully located by gently rotating
it during fitment.
• Remember! Your Flymo Cordless Trimmer is
designed to use only nylon line with a
maximum diameter of 1.5mm. Use only
genuine Flymo nylon line.
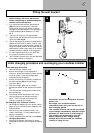
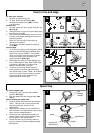
To manually feed the nylon line
If required, line can be fed out manually. To
operate, gently pull on the line whilst at the
same time alternately pressing and releasing
the button, on the side of the spoolholder. See
fig V.
To replace nylon line. Replacement nylon line
is available from most Flymo/Partner stockists.
You can buy it either as spool and line
complete, or as nylon line only.
To replace spool and line (complete)
1. Take new spool and remove tape holding
line in place.
2. Unwind approximately 100mm of line and
feed this through eyelet, see fig W, then
drop the spool into spoolholder smooth
side uppermost.
To replace nylon line on spool.
1. Take line and insert into hole in spool.
2. Turn spool clockwise to wind on required
amount of line, (approx. half = 10m) and
cut line to length, see fig X. Care should
be taken to ensure that the line is neatly
coiled on the spool. Failure to do so will
impair the efficiency of the automatic line
feed.
3. Leave approximately 100mm of line
unwound and feed this through eyelet, see
fig W, then drop the spool into the
spoolholder smooth side uppermost.
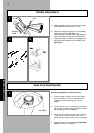
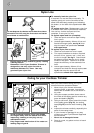
Caring for your Cordless Trimmer
Y
1
2
3 4
• Avoid accidental starting. Keep your hands
and fingers away from the switch lever while
inspecting, cleaning or carrying out any
maintenance work.
• Keep fingers and hands clear of line cutter on
leading edge of guard.
After you have finished using your Flymo
trimmer follow the procedure below:
1. Never clean your trimmer with water,
cleaning fluids, or solvents, just remove
debris with a suitable tool, a soft brush or
dry cloth.
2. Using the scraper provided, clean around
the inside of the safety guard to remove any
grass and debris. (Fig Y1)
3. Using a soft brush, clean around the inside
of the safety guard (Fig Y2), the cutting
head (Fig Y3) and the motor housing. (Fig
Y4)
4. Inspect the trimmer carefully, especially the
parts of the cutting head.
5. If your trimmer is damaged in any way
contact your local Flymo/Partner approved
service centre.
• Never use a damaged trimmer
6. Store in a cool, dry place and out of reach
of children.