20
FALSE SIGNALS
A “false signal” occurs when something that shouldn’t, sounds like
a good target. Your 1236-X2 does an excellent job of ignoring junk,
but it’s so sensitive to good targets that it can be fooled by bad
targets with similar electrical characteristics. Large pieces of trash,
for example, or even some kinds of bottle caps and pull tabs can
fool you. Small pieces of trash less than 2 inches from the search
coil will also sound good occasionally.
So what do you do about false signals? Well, 90 percent of them
will sound suspicious to you after you’ve had some experience,
and you’ll just ignore them. They may be very faint or very abrupt
with static. Often when you go back over the same spot, a false
signal will simply disappear. Other false signals may be very loud
and sharp, but most of these will disappear if the coil is speeded
up or raised slightly. Some shallow, large or irregular pieces of junk,
however, will fool the 1236-X2 no matter what you do.
Here’s some other sources of false signals and what to do about
them:
1. Detector Interference: Caused by nearby
metal detectors operating at the same (or close)
frequency. SOLUTION: Adjust the FREQUENCY control
to the left or right of zero.
2. Electrical Interference: Caused by radio/TV
stations, power lines, etc. SOLUTIONS: Move further
away, lower the sensitivity, reduce the sweep speed.
Try changing the FREQUENCY control position. Wrap
the search coil cable tightly around the stem.
3. Highly Mineralized Soil: Usually causes constant
static or good target sounds. SOLUTIONS: Lower
the sensitivity, increase the discrimination. Raise the
search coil until false signals disappear and sweep
at that height.
4. Wet Sand: Same as highly mineralized soil.
9
BODY or HIPMOUNTING
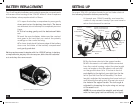
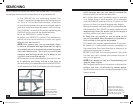
1. Disconnect the search coil cable from the
control housing and unwind all but the last 12
inches or so from the upper handle. Secure the
lower end of the cable with a Velcro® strap at
least 12 inches up from the coil.
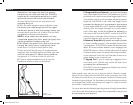
2. Remove the control housing from the hand grip
by holding the grip with one hand and sliding the
housing toward you with the other.
3. Attach your belt to the control housing by
slipping it through the slots on the underside of the
control housing.
4. Reconnect the search coil cable to the control
housing.
5. The control housing can also be mounted on
on the optional Fisher Chest Harness. It is especially
important that the cable connector be installed
tightly (hand tightened only) to prevent false
signals during body-mount use.
Note:
For belt mounting, left handers should wear the
housing on their right hip and right handers should
wear it on their left hip.
Once removed from the stem, the control box
can be hip or chest mounted leaving only the
stem and search coil to swing.
1236x2 manual-8704810.indd 9 6/9/06 10:08:58 AM


