- 34 -
onto the end of the axle. Leave approximately 1/8” (3 mm) from the outer
surface of the spacer nut to the end of the axle inside the nut.
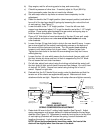
i) Insert the assembled nut and axle into the wheel on the side of the wheel
with the new seal and bearing.
j) With the open end of the wheel facing up, fill the area inside the wheel
around the axle full of NGLI grade #1 multi-purpose grease.
k) Insert the second bearing and new seal into the wheel.
l) Apply a thread locking adhesive to the 2
nd
spacer nut and thread onto the axle
with the wrench flats facing outward.
m) Torque the nut to 75-80 in-lbs. (8-9 N-m), loosen, then re-torque to 20-25
in-lbs. (2-3 N-m). Make sure axle does not extend beyond either nut.
n) Re-install the seal guards over the wheel hub and insert wheel into caster
fork. Re-install caster bolt and tighten nut fully.
IMPORTANT: To prevent seal and bearing damage, check the bearing
adjustment often. Spin the caster tire. The tire should not spin freely (more
than 1 or 2 revolutions) or have any side play. If the wheel spins freely,
adjust torque on spacer nut until there is a slight amount of drag. Re-apply
threadlocking adhesive.
5.1.18 Lubricate brake handle pivot
:
Service Interval: 160 hrs.
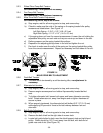
a) Stop engine, wait for all moving parts to stop, and remove key.
b) Lubricate bronze bushings on brake handle pivot with a spray type lubricant
or light oil.
5.1.19 Lubricate brake rod bushings
:
Service Interval: 160 hrs.
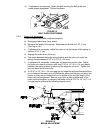
a) Stop engine, wait for all moving parts to stop, and remove key.
b) Lubricate bronze bushings on each end of brake rod shaft with a spray type
lubricant or a light oil (bushings are located to the inside of the flange
bearings).
5.1.20 Lubricate motion control bronze bushings
:
Service Interval: 160 hrs.
a) Stop engine, wait for all moving parts to stop, and remove key.
b) Tilt seat up.
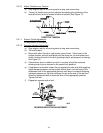
c) Lubricate bronze bushings on flange bearings securing the motion control
arm shafts with a light oil or a spray type lubricant.
5.1.21 Drain fuel filter
:
Service Interval: When Water in Fuel warning light is “ON”
a) Stop engine, wait for all moving parts to stop, and remove key.
b) Place a drain pan under the fuel filter and loosen the drain plug
approximately 1 turn.
c) Water should drain.
d) When fuel begins to flow from the filter, tighten the drain plug.
e) Prime the fuel system (See Section 5.1.23).
f) Start engine. Make sure warning light goes out. Check for leaks.
IMPORTANT: Water or other contaminants in fuel can severely damage fuel
pump and/or the other engine components.


