


Maintenance
Note: Replace a cracked, fouled, or dirty spark
plug. Do Not clean the electrodes because grit
entering the cylinder can damage the engine.
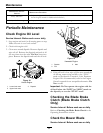
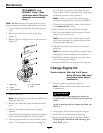
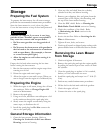
5. Set the gap on the plug to 0.030 inch (0.76 mm)
(
Figure 29).
Figure 29
1. Side electrode
3. Air gap—0.030 inch
(0.76 mm)
2. Center electrode
insulator
6. Install the spark plug and the gasket seal.
7. Torque the plug to 17 ft-lb (23 N-m).
8. Connect the wire to the spark plug.
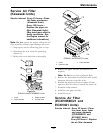
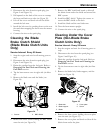
Emptying the Fuel Tank and
Cleaning the Fuel Filter
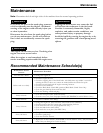
Service Interval: Every 100 hours
The fuel lter (screen) element is located inside the
fuel tank (if applicable).
1. Stop the engine and wait for it to cool down.
Note: Drain gasoline for a cold engine only.
2. Disconnect the wire from the spark plug
(Figure 10).
3. Close the fuel valve.
4. Disconnect the fuel line by loosening the tube
clamp at the carburetor.
5. Open the fuel valve by turning the lever to the
open position.
6. Drain the gasoline completely from the tank and
fuel line into an approved fuel container.
7. Remove the fuel tank from the mower.
8. Close the fuel valve.
9. Pour a small amount of fuel in the fuel tank, move
the fuel around in the tank, and pour it out into
an approved fuel container.
10. Install the fuel tank and fuel line.
Adjustments
Note: Wait for all moving parts to stop and remove
spark plug wire before servicing, cleaning, or making
any adjustments to the unit.
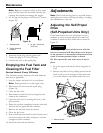
Adjusting the Self-Propel
Drive
(Self-Propelled Units Only)
If the lawn mower does not self-propel or has a
tendency to creep forward when the control bail
is released, adjust the drive cable nuts as shown in
Figure 31.
DANGER
Checking the operation of the mower with the
belt cover removed will allow debris to be thrown
in the operator's or bystander's direction and can
result in serious personal injury or death.
Do Not operate the unit when cover is not in
place.
1. Stop the engine and wait for all moving parts to
stop.
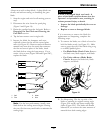
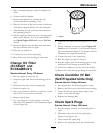
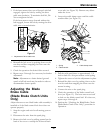
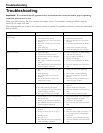
2. Remove the belt cover by pulling upward on the
back of the cover to unsnap the front and back
cover tabs. Remove any debris under the cover.
Figure 30
1. Belt cover tabs
28