


Maintenance
motion control levers moved out in the neutral
lock position. The operator does not need to be
in the seat to start the engine.
Try to start with operator in seat, parking brake
disengaged, PTO disengaged and motion control
levers in the neutral lock position - starter must
not crank.
Try to start with operator in seat, parking brake
engaged, PTO engaged and motion control
levers in the neutral lock position - starter must
not crank.
Try to start with operator in seat, parking
brake engaged, PTO disengaged, and the left
motion control lever in, starter must not crank,
repeat again with the right lever in, then with
both levers in - starter must not crank.
2. Check the kill circuits. Run engine at one-third
throttle, disengage parking brake and raise off
of seat (but do not get off of machine) engine
must initiate shutdown after approximately 1/2
second has elapsed (seat has time delay kill switch
to prevent cut-outs on rough terrain).
Run engine at one-third throttle, engage PTO
and raise offof seat (but do not get off of
machine) engine must initiate shutdown after
1/2 second has elapsed.
Run engine at one-third throttle, with brake
disengaged, move levers in and raise off seat (but
do not get off of machine) engine must initiate
shutdown after 1/2 second has elapsed.
Again, run engine at one-third throttle, brake
engaged, and move left motion control lever in
- engine must initiate shutdown.
Repeat again moving the right lever in, then
moving both levers in - engine must initiate
shutdown whether operator is on seat or not.
Note: If machine does not pass any of these tests,
do not operate. Contact your authorized EXMARK
SERVICE DEALER.
Important: It is essential that operator safety
mechanisms be connected and in proper
operating condition prior to use for mowing.
Check Rollover Protections
Systems (Roll Bar) Pins
Service Interval: Before each use or daily
Make sure latch pin and hair pin are fully installed
and lanyard is in good condition.
Check Seat Belt
Service Interval: Before each use or daily
Visually inspect seat belt for wear, cuts, and proper
operation of retractor and buckle. Replace before
operating if damaged.
Check for Loose Hardware
Service Interval: Before each use or daily
1. Stop engine, wait for all moving parts to stop, and
remove key. Engage parking brake.
2. Visually inspect machine for any loose hardware
or any other possible problem. Tighten hardware
or correct the problem before operating.
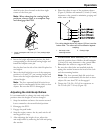
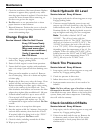
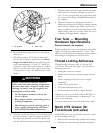
Service Air Cleaner
Service Interval: Every 50 hours—Service
the air cleaner. (May
need more often under
severe conditions. See
the Engine Owner’s
Manual for additional
information.)
Every 600 hours— Replace
the air cleaner elements.
(May need more often
under severe conditions.
See the Engine Owner’s
Manual for additional
information.)
1. Stop engine, wait for all moving parts to stop, and
remove key. Engage parking brake.
2. Unhook two air lter canister latches to gain
access to the air cleaner element.
3. Remove air cleaner canister cover and remove
outer element.
4. Check the condition of the paper element.
Replace if dirty, bent or damaged.
31