


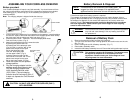
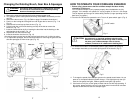

ASSEMBLING YOUR CORDLESS SWEEPER
3
Before you start:
Your Cordless Sweeper will require very little assembly. You should remove it from
the carton and familiarize yourself with all the components listed per the exploded
view drawing (pg. 2) This will help you in the assembly and operation of your
cordless sweeper.
Note: The charging adapter is shipped inside the dust cup.
Insert into Lower
Handle
Fig. 3
CAUTION: ALWAYS USE ADAPTOR SUPPLIED (ONLY)
WITH SWEEPER
Lower Handle
Fig. 2
1. In the event that the edging tool is not attached to the sweeper, insert the edging
tool into the "square" hole under the bottom of the sweeper power head. Gently
but firmly push until the edging tool locks into place. (Fig. 1)
2. Insert the lower handle - small end - into the sweeper power head.
Push until firmly in place. (Fig. 2)
3. Attach the telescoping tube to the extension tube
by pushing the plastic insert into
the bottom part of the telescopic pole.
(Fig. 3a) Push in until the "tab" on the
plastic insert snaps into the open
slot on the telescopic tube.
Push the telescoping tube
into the upper handle. (Fig. 3)
Insert the extension tube into the
lower handle so that the “tab” on the
plastic insert snaps into the open
slot on the lower handle. (Fig. 3b)
4. Place the handle into the upward
storage position.
5. Plug the charging adapter into the
sweeper power head charging jack.
Plug the charging adapter cord
into a standard electrical outlet
(120V, 60Hz.) The red charging
indicator should illuminate or flash. If
it does not, depress the On/Off switch
one time.
Fig. 1
Fig. 3a
Fig. 3b
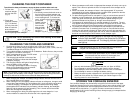
Battery Removal & Disposal
8
NOTE: If uncertain as to how to remove your battery pack, we
suggest you take your sweeper to a reputable small
appliance service technician to have this service performed.
Follow these steps when battery removal is required.
This sweeper is equipped with Ni-Cd batteries and you need to dispose of them
properly. When the batteries are no longer good for use, they must be removed from
the sweeper for disposal. Do not remove the batteries for any reason other than
disposal of them. The batteries must be recycled or disposed of in accordance
with local regulations. Please consult your Yellow Pages or local recycling
center for more information.
Removal of Battery Pack
1. Remove the extention handle and dust cup container.
2. Turn unit over so that the base is facing upwards. Be careful not to turn the unit
ON. (Fig. 16)
3. Push in locking tab and lift off battery assembly. (Fig. 17)
4. Place battery assembly aside.
5. Insert the new battery assembly into unit. Ensure that locking tab snaps in place.
WARNING: You must never use ordinary batteries for replacement as these
may leak and cause damage. Use only battery pack X9730
for replacement.
CAUTION: This appliance contains Ni-Cd batteries. The batteries must
be recycled or disposed of in accordance with local
regulations. Please consult your Yellow Pages or local
recycling center for more information.
Fig. 16
Fig. 17