


10
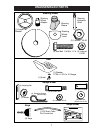
CHECK TIRE PRESSURE
The tires on your tractor were overinfl ated
at the factory for shipping purposes. Cor-
rect tire pressure is important for best
cutting performance.
• Reduce tire pressure to PSI shown in
“PRODUCT SPEC I FI CA TIONS” section
of this manual.
CHECK DECK LEVELNESS
For best cutting results, mower housing
should be properly leveled. See “TO LEV-
EL MOWER HOUSING” in the Service
and Adjustments section of this manual.
✔
CHECKLIST
Before you operate your new trac tor, we
wish to as sure that you re ceive the best
performance and sat is fac tion from this
quality product.
Please review the following checklist:
✓ All assembly instructions have been
com plet ed.
✓ No remaining loose parts in carton.
✓ Battery is properly prepared and
charged. (Minimum 1 hour at 6 amps).
✓ Seat is adjusted comfortably and tight-
ened securely.
✓ All tires are properly infl ated. (For ship-
ping purposes, the tires were over in -
fl ated at the factory).
✓ Be sure mower deck is properly lev eled
side-to-side/front-to-rear for best cutting
results. (Tires must be properly in fl at ed
for leveling).
✓ Check mower and drive belts. Be sure
they are routed prop er ly around pul leys
and inside all belt keepers.
✓ Check wiring. See that all connections
are still secure and wires are properly
clamped.
✓ Before driving tractor, be sure free wheel
control is in “transmission engaged”
position (see “TO TRANS PORT” in the
Operation section of this man u al).
While learning how to use your tractor, pay
extra attention to the following im por tant
items:
✓ Engine oil is at proper level.
✓ Fuel tank is fi lled with fresh, clean, reg-
u lar unleaded gas o line.
✓ Become familiar with all controls - their
location and func tion. Operate them
be fore you start the engine.
✓ Be sure brake system is in safe op er -
at ing condition.
✓ It is important to purge the trans mis sion
before op er at ing your tractor for the fi rst
time. Follow proper starting and trans-
mis sion purg ing instructions (See “TO
START EN GINE” and “PURGE TRANS-
MIS SION” in the Op er a tion sec tion of
this man u al).
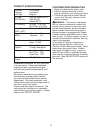
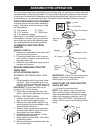
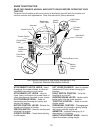
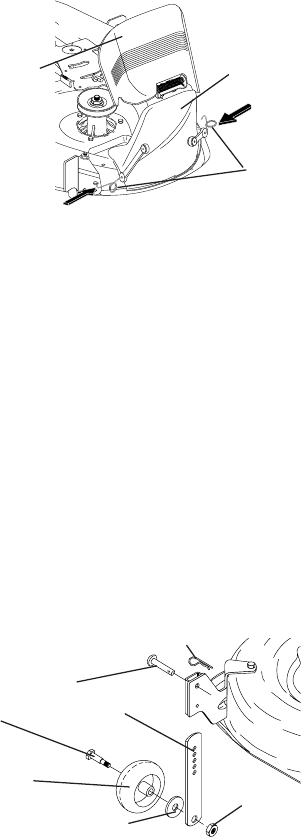
02115
Shoulder
Bolt
Gauge
Wheel
3/8-16 Center
Locknut
3/8 Washer
Ad just ing
Bar
Pin
Retainer Spring
ASSEMBLE GAUGE WHEELS TO
MOWER DECK
The gauge wheels are designed to keep
the mower deck in proper position when
operating mower. Be sure they are prop-
er ly adjusted to ensure optimum mower
performance.
1. Slide gauge wheel bar down into
bracket channel, Be sure that gauge
wheel bar aligning holes are on top. As-
sem ble gauge wheels as shown using
shoulder bolts, 3/8 washers and 3/8-16
center locknuts and tighten securely.
2. Adjust gauge wheels before operat-
ing mower. See “TO ADJUST GAUGE
WHEELS” in the Operation sec tion of
this manual.
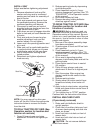
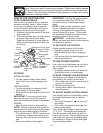
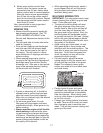
02114
Defl ector
Shield
Latch
Hooks
Mulcher
Plate
CHECK FOR PROPER POSITION
OF ALL BELTS
See the fi gures that are shown for replac-
ing motion and mower blade drive belts
in the Service and Adjustments sec tion
of this manual. Verify that the belts are
routed cor rect ly.
CHECK BRAKE SYSTEM
After you learn how to operate your trac-
tor, check to see that the brake is properly
adjusted. See “TO ADJUST BRAKE” in
the Service and Adjustments section of
this manual.
TO CONVERT TO BAGGING OR
DISCHARGING
Simply remove mulcher plate and store in
a safe place. Your mower is now ready for
discharging or installation of optional grass
catcher accessory.
NOTE: It is not necessary to change
blades. The mulching blades are de signed
for discharging and bagging also.