26
F. Deck leveling Procedure
1. Park the mower on a flat paved surface, engage
the parking brake, shut off the engine, remove
the key from the ignition switch, disconnect the
spark plug wires and using the transport lever,
lower the mowing deck into the 4" height of cut
position. (The 4" height of cut position is recom-
mended in order for one to see and obtain a
measurement. Any height of cut position is
acceptable as long as a proper measurement
can be taken.)
2. Check the right and left front tire pressure.
Adjust as necessary to 20-25 psi. Tire pressure
can affect blade height by as much as a 1/4”.
3. Check the right and left rear Drive tire pressure.
Adjust as necessary to 10-12 psi.
4. Measure blade-to-ground height at the front tip
of the right blade. To obtain an accurate mea-
sure, align blades in parallel with mower center-
line, (i.e. front to back).
5. Measure blade-to-ground height at the front tip
of the left blade. Be sure to measure at the
blade tip with the blades arranged in proper
position.
6. To level the deck, adjust the threaded bolt on the
left side of the deck (Point B) so that the blade-
to-ground height at the right front blade tip
matches that of the left front blade tip. This is
done by loosening the jam nut on the threaded
bolt and tightening the upper nut to raise the
deck and loosening the nut to lower the deck.
The right front blade tip height is fixed so you
must adjust the left front tip to match it.
7. Measure the blade-to-ground height at the right
rear blade tip. Again be sure to measure at the
blade tip at the rear of the right blade when
aligned along the mower centerline. The blade-
to-ground height at the rear of the blade tip
should be 1/8" to 1/4” higher than the front tip.
This is referred to as blade pitch. The same
height difference should be true for the left
blade, measured front and back.
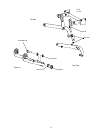
8. To adjust the blade pitch the deck pitch must be
adjusted. Loosen the inner jam nut at the front
rod end to raise the front of the deck, tighten the
hex-head bolt to reduce the deck pitch.
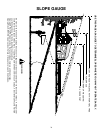
(see Fig. 11)
G. Deck lift cable adjustment Procedure
Note:
Start at either side w/ wings in down
position. Do one side then the other
.
1. Remove deck wing latch system covers using
a 9/16” wrench.
2. Activate lift switch quickly “on” then “off” to
raise the wings. (This will slowly tighten the
cable in increments).
3. Observe which cable tightens first.
4. Keep activating the switch until one of the
deck wing latches just begins to release
(slightly disengaged).
5. Tighten the opposite cable using two 1/2”
open end wrenches until that deck wing latch
appears to be at the same relese point as the
other.
6. Again, activate lift switch quickly “on” and “off”
until one of the latches just begins to release.
7. Check the opposite cable to verify that the
deck latch is at the same release point as the
other.
8. Lower the wing and repeat the procedure to
verify that both latches are releasing at the
same point.
9. Repeat the above procedure on the other side
of the deck. (Steps 1 through 8)
10. After adjusting both sides, raise and lower the
wings full up and full down as normal opera-
tion. (20+ cycles required)
11. Wings should come up simultaneously,
smoothly w/o ticking, binding or abrupt
unlatching of the locks.
12. Readjustment is required if there is any stick-
ing or wings obviously do not raise together
(one side starts raising before the other).
13. After 20+ trouble free cycles reinstall latch
sytem covers.


