


19se c t i O n 6 — Ma i n t e n a n c e & ad j u s t M e n t s
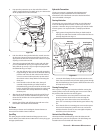
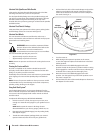
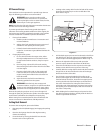
Pop open the protective cap on the end of the oil drain 3.
valve to expose the drain port. Refer to Fig. 6-1. Remove the
oil fill cap/dipstick from the oil fill tube.
Push the oil drain hose (packed with this manual) onto the 4.
oil drain port. Route the opposite end of the hose into an
appropriate oil collection container with at least a 2.0 quart
capacity, to collect the used oil.
The engine is equipped with either a twist-and-pull drain 5.
port or a tabbed drain port. If your engine has the twist-
and-pull drain go to step a. If your engine is equipped with
the tabbed drain go to step b.
Turn the oil drain valve a. ⁄-turn, then pull outward to
begin draining oil. After the oil has finished draining,
push the end of the oil drain valve back in and turn
⁄turn to secure it back in place Re-cap the end of
the oil drain valve to keep debris from entering the
drain port.
Pinch the tabs on the oil drain valve, then pull b.
outward to begin draining oil. After the oil has
finished draining, push the end of the oil drain valve
back in, until the tabs click into place. Re-cap the end
of the oil drain valve to keep debris from entering
the drain port.
After the oil has finished draining, push the end of the oil 3.
drain valve back in, until the tabs click into place. Re-cap
the end of the oil drain valve to keep debris from entering
the drain port.
Replace the oil filter, and refill the engine with new oil as 4.
instructed in the Kohler Owner’s Manual.
Air Cleaner
Service the pre-cleaner and cartridge/air cleaner element as
instructed in the Kohler Owner’s Manual.
Spark Plug
The spark plugs should be cleaned and the gap reset once a
season. Refer to the Kohler Owner’s Manual for correct plug type
and gap specifications.
Hydrostatic Transmission
The zero turn tractor is equipped with dual integrated
hydrostatic pumps/transaxles that are sealed and are
maintenance-free. Fluid levels cannot be checked and fluid
cannot be added or changed.
Steering Lubrication
The steering arms, pivot shafts, and axles must be lubricated
if ever the steering effort increases, or after every 25 hour of
operation. Lubricate using a pressure grease gun and Cub Cadet
251H EP grease, or an equivalent No. 2 multipurpose lithium
grease.
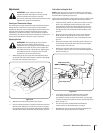
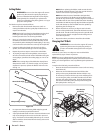
Apply grease through the lube fitting on the RH and LH 1.
steering arms which are located at rearward end of the two
steering drag links. See Fig. 6-2.
Locate the lube fittings for the pivot shaft and axle on the 2.
front of one end of the axle pivot bar. Apply grease through
the two lube fittings, then repeat to lubricate the other end
of the pivot bar. See Fig. 6-2.
Cleaning Steering Gears
Once a year, or if a tight spot is experienced when turning the
steering wheel, remove the steering gear cover on each end of
the pivot bar and clean the two steering gears.
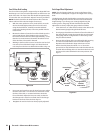
From beneath the cover base plate on each end of the 1.
pivot bar, remove the three hex screws securing the
steering gear cover. Remove the covers and clean the
gears. It is not necessary to lubricate the gears. Refer to Fig.
6-2.
Insert the tab of the LH steering gear cover into the square 2.
hole in the LH base plate, position the cover, and secure
with the three hex screws. Do not over tighten. Repeat to
install the cover on the RH side.
Lubricate Front Wheel Bearings
Lubricate the front wheel bearings with Cub Cadet 251H EP
grease after every 25 hours of operation. The lube fittings are
located in the rim hub inside each front wheel.
Figure 6-1
Steering
Gear Cover
Steering Arm
Lube Fitting
Shoulder
Bolt
Cover Tab
Axle Pivot Bar
Lube Fittings
Hex Screw
Figure 6-2