


43
INSPECTION OF COOLING SYSTEM HOSES
Check the cooling system hoses for any cracks or
deterioration every 200 hours of operation. Check
all hose connections for looseness. Replace any
damaged hoses and tighten any loose connections.
CHANGING THE ENGINE COOLANT
The engine coolant should be drained and replaced
with new coolant solution after every 400 hours of
operation.
The dry capacity of the cooling system is
approximately 3.5 Qts. Follow the instructions
provided previously in this manual under
CHECKING ENGINE COOLANT LEVEL when
mixing the coolant solution.
Change the engine coolant as follows:
• Drain the coolant when the engine is cold.
• Place the tractor on a level surface and raise the
tractor hood.
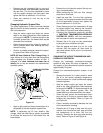
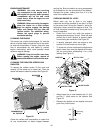
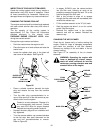
• Locate the radiator drain plug in the lower left
rear corner of the radiator. See Figure 56.
Figure 56
• Place a suitable container beneath the drain
plug and remove the cap from the overflow
reservoir.
• Turn the drain plug counterclockwise to re-
move. Allow as much of the old coolant as pos-
sible to drain from the system.
Coolant is a toxic substance. Dispose of in
an environmentally safe manner. Contact
your area EPA office for proper disposal
methods and recycling center locations.
• Reinstall the drain plug and turn clockwise until
fully tightened.
• Turn the remote radiator cap counterclockwise
to the first stop, then push downward on the
cap and turn counterclockwise to remove.
Refer to Figure 55.
• In stages, SLOWLY pour the coolant solution
into the filler neck, allowing as much air as
possible to escape through the neck. Fill to the
overflow flange of the filler neck.
• Wait a few minutes to allow air to escape
through the filler neck and refill as needed, then
reinstall the radiator cap.
• Fill the overflow reservoir to the "H" (full) mark.
• Start the engine and allow it to run for a short
period. Stop the engine.
• Recheck the coolant level in the overflow
reservoir and refill as needed. Reinstall the
reservoir cap.
CHANGING THE AIR CLEANER
Check the air cleaner daily or before starting the
engine. Check for loose or damaged components
and check the condition of the filter element.
Remove any buildup of dirt and debris in the air
cleaner housing.
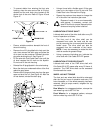
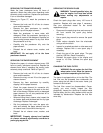
See Figure 57 for assembly of the air cleaner
elements.
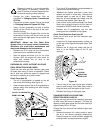
WARNING: Operating the engine with
loose or damaged air cleaner compo-
nents will allow unfiltered air into the
carburetor, causing extensive wear and
eventual failure of the engine.
Figure 57
OVERFLOW
RESERVOIR
COOLANT
DRAIN PLUG
KNOB
WASHER
AIR
WING NUT
FOAM
PRECLEANER
ELEMENT
BASE SEAL
AIR
CLEANER
BASE
AIR
CLEANER
BODY
CLEANER
COVER
PAPER
ELEMENT