


16
with the choke closed as this will cause flooding
and make starting more difficult. Instead, fully
open the choke and start the engine.
WARNING: If the starter disengages the
engine flywheel, but the engine does
not continue to run, allow the engine to
come to a complete stop before
attempting to restart the engine. Dam-
age to the starter may result from
failure to do so.
• After the engine starts, slowly release the brake
pedal. As the engine warms up, gradually push
the choke control knob all the way in. Do not
use the choke to enrich the fuel mixture, except
as necessary to start the engine.
• After the engine has started, let the engine run
for approximately three to five minutes at mid
throttle before putting the engine under load.
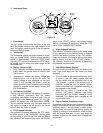
• Observe the instrument panel. If the battery
indicator light, oil pressure light, or coolant
temperature light comes on, immediately stop
the engine. Have the tractor inspected by your
Cub Cadet dealer.
COLD WEATHER STARTING
Be sure to use the proper oil for the expected
temperatures and use winter grade fuel. Follow the
normal engine starting instructions above.
However, allow the engine ample time to warm up
before putting the tractor under load.
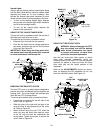
USING JUMPER CABLES TO START ENGINE
WARNING:
Batteries contain sulfuric
acid and produce explosive gasses.
Make certain the area is well ventilated,
wear gloves and eye protection, and
avoid sparks or flames near the battery.
If the battery charge is not sufficient to crank the
engine, recharge the battery. If a battery charger is
unavailable and the tractor must be started, the aid
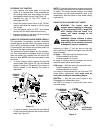
of a booster battery will be necessary. Connect the
booster battery as follows:
• Connect the end of one cable to the disabled
tractor battery’s positive terminal; then connect
the other end of that cable to the booster
battery’s positive terminal.
• Connect one end of the other cable to the
booster battery’s negative terminal.
• Connect the other end of that cable to the
frame of the disabled tractor, as far from the
battery as possible.
• Start the disabled tractor following the normal
starting instructions previously provided; then
disconnect the jumper cables in the exact
reverse order of their connection.
• Have the tractor’s electrical system checked
and repaired as soon as possible to eliminate
the need for jump starting.
STOPPING THE ENGINE
• Place the PTO switch in the “OFF” position.
• Place the throttle control lever in the “SLOW”
position and allow the engine to idle for about
one minute.
• Turn the ignition key to the “OFF” position and
remove the key from the ignition switch.
NOTE:
Always remove the key from the ignition
switch to prevent accidental starting or battery
discharge if the equipment is left unattended.
DRIVING THE TRACTOR
WARNING: Avoid sudden starts, exces-
sive speed and sudden stops. DO NOT
use the seat belt if the ROPS structure
has been removed from the tractor.
WARNING: Do not leave the seat of the
tractor without disengaging the PTO
and engaging the parking brake. If
leaving the tractor unattended, turn the
ignition key off and remove key.
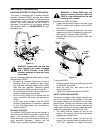
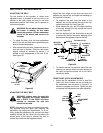
• Adjust the operator’s seat to the most comfort-
able position that allows you to operate all
controls and pedals. See seat adjustment in the
ADJUSTMENTS section.
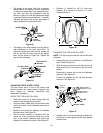
WARNING: DO NOT use the seat belt if
the ROPS has been lowered or
structure has been removed from the
tractor.
• Adjust the seat belt to fit snugly but comfortably
around your lap, then buckle the seat belt.
Refer to ADJUSTMENTS section.
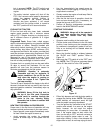
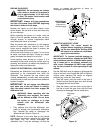
• Shift the transmission Hi/Lo range shift lever on
the left fender to the desired speed setting.
Refer to USING THE HI/LO RANGE SHIFT
LEVER in sub-section below.
• Use the tractor and/or auxiliary hydraulic lift
lever(s) to raise all tractor attachments from the
ground if transporting the tractor to a work site.
• Depress the brake pedal to release the parking
brake, then slowly release the brake pedal.
• Move the throttle handle to the position where
the engine operates best for the load to be
handled (normally 3500-3600 RPM).
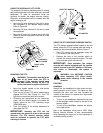
• Slowly depress either the forward or reverse
pedal to move the tractor in the desired
direction. Refer to USING THE FORWARD
and REVERSE PEDALS in paragraphs below.