


8
• Remove the cutting deck from beneath the tractor
(refer to instructions for Deck Removal in your tractor’s
operator’s manual), then gently flip the deck over to
expose its underside.
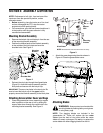
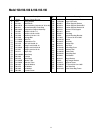
• Place a block of wood between the center deck
housing baffle and the cutting blade to act as a
stabilizer. See Figure 5.
• Use a 15/16" wrench to remove the hex flange nut
that secures the blade to the outer blade spindle
assembly. See Figure 5.
Figure 5
• Place a new blade on top of the outer blade spindle
so that side of the blade with part number faces the
ground when the mower is in the operating position.
• Secure with the hex flange nut removed earlier.
Use a torque wrench to tighten the hex flange nut
between 70 to 90 foot-pounds.
• Replace blade from the other outer blade spindle
with the second blade from the bagger kit.
NOTE: The center blade spindle will continue to use the
standard cutting blade already attached to the deck.
• Remount the cutting deck following instructions in
the owner’s manual of the tractor.
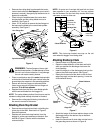
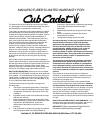
Attaching Chute Stop Bracket
• Remove the carriage bolt and lock nut holding the
chute stop to the deck. See Inset A of Figure 6.
Save the hardware.
• Replace with new chute stop bracket, from the
bagger kit, at the same position on the deck. See
Inset B of Figure 6. Secure with the hardware
removed earlier.
NOTE: An extra set of carriage bolt and lock nut have
been supplied in your accessory kit. You may replace
the old hardware for the chute stop bracket with these
new ones, or save for later use.
Figure 6
NOTE: This chute stop bracket may stay on the unit
even when the bagger is not being used.
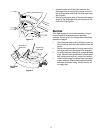
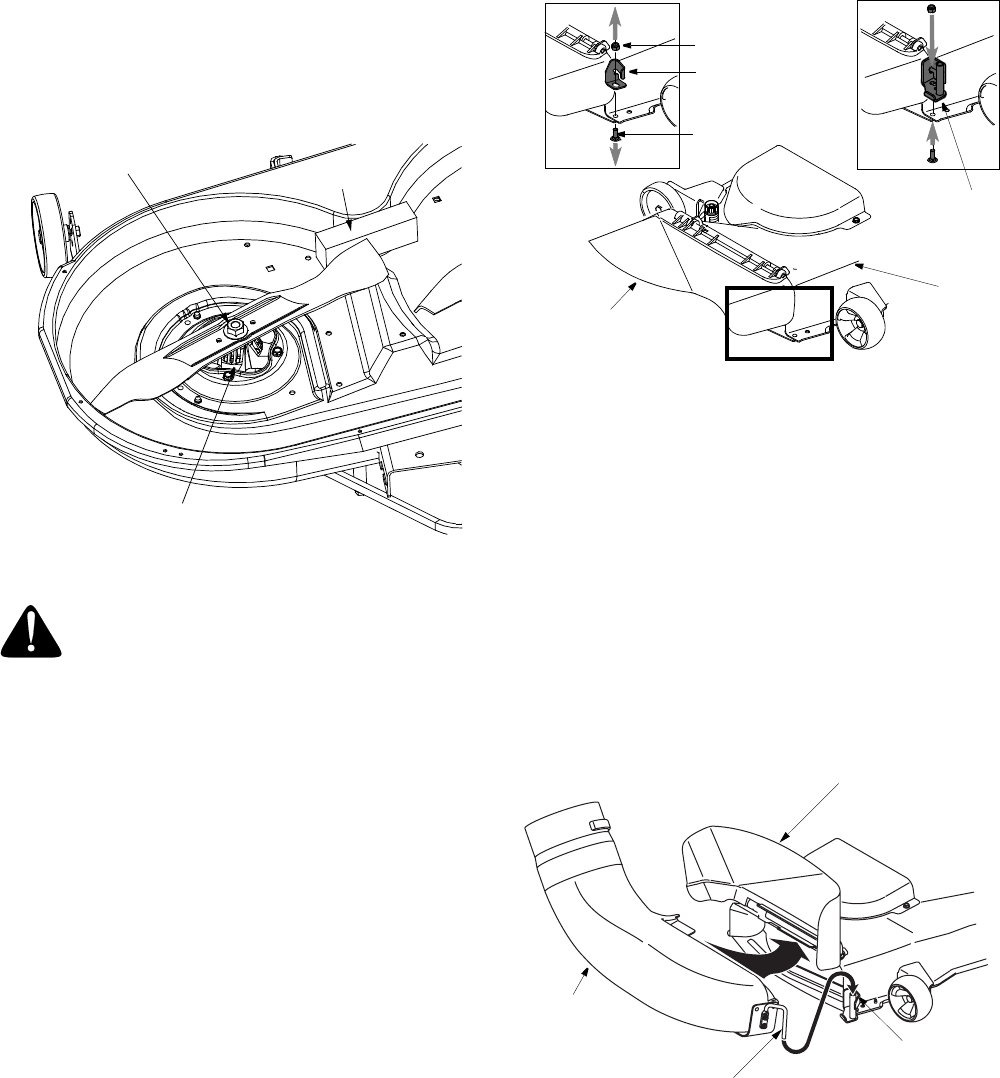
Attaching Discharge Chute
• Raise the deck to its highest position.
• Raise the chute deflector on the deck and hold it
while you position the discharge chute over the
chute opening.
• Insert the hinge pin of the discharge chute into the
tube on the chute stop bracket. See Figure 7.
• Rotate the chute around the deck so that its front
edge fits snugly into the deck opening. Lower the
chute deflector slowly.
Figure 7
• Attach the longer of the three retainer straps on the
discharge chute to the retainer clip on the deck.
Refer to Figure 9.
• Insert the curved end of chute tube into the hole in
the grass bag cover as shown in Figure 8.
WARNING: The hex flange nut has a right-
handed thread pattern. Do not attempt to force
the nut in an incorrect direction; it may damage
the nut and create a safety hazard.
Spindle Assembly
Hex Flange Nut
Wood Block
A
B
Carriage Bolt
Lock Nut
Remove this
chute stop
Install this
Chute Deflector
Deck
chute stop
Discharge
Chute
Insert hinge
Hinge Pin
Chute Deflector
pin here