


7
SECTION 3: ASSEMBLY & OPERATION
NOTE: References to left, right , front and rear of the
tractor are from the operator’s position, unless
otherwise stated.
• Before assembly, place the tractor on a firm, level
surface, disengage the PTO, stop the tractor
engine and set the parking brake.
• For convenience, pivot the seat forward and leave it
in that position until the grass collector is fully
mounted and assembled.
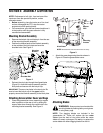
Mounting Bracket Assembly
• Remove the hairpin clip and clevis pin from the rear
of the mounting bracket assembly.
• Position the hooked ends of the bracket assembly
to the outside of the hitch plate and over the
shoulder bolts. See Figure 2.
Figure 2
• Reinsert the clevis pin through the aligned holes
(Figure 2) in both the bracket assembly and the
hitch plate and secure with the hairpin clip.
IMPORTANT:
There are two holes in the clevis pin. Be
sure to insert the hairpin clip in the upper hole to
properly secure the bracket assembly to the hitch plate.
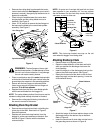
Attaching Grasscatcher Cover and Bags
• Place the grasscatcher cover assembly’s support
tube in position on the rear of unit by sliding the
support tube down through the center hole in the
mounting bracket assembly. See Figure 3.
Figure 3
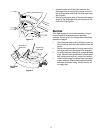
• Attach the grass bags using the slots shown in
Figure 4. Close the grasscatcher cover.
Figure 4
Attaching Blades
NOTE: Two bagging blades are included in the
grasscatcher kit. These will replace the two outer
blades from the deck of the tractor while the center
blade will remain unchanged. Do not try to replace the
center blade with either bagging blade from the kit.
Shoulder Bolt
Mounting
Bracket
A
l
i
g
n
t
h
e
s
e
h
o
l
e
s
WARNING: Always protect your hands while
servicing blades by wearing heavy work gloves
or using heavy rags.
NOTE: Grasscatcher cover not shown here for clarity
Hitch Plate
Mounting
Bracket
Support
Tube
Slots
Grass Bag
Grass
Bag
Cover