21
cavitation to develop which can destroy the
pumps in a short time.
Contaminants or foreign matter in the oil will
also damage the pumps . To prevent this, use
a filter that captures particles as small as 30
microns or 30 millionths of a meter in diame-
ter. You can help in the battle against dirt by
being very careful when you remove or repair
a component in the hydraulic system. Thor-
oughly clean off any component before you
work on it. Plug the ends of any hose or line
you remove with a rubber or plastic plug. Use
plastic caps to seal off the ends of hydraulic
fittings. Place any component you remove in a
clean plastic bag so it can’t pick up dust or
dirt. Clean your hands frequently when work-
ing on the hydraulic components.
Note:
The pumps are not owner-repairable.
If a pump fails, contact your Cub Cadet Ser-
vice Dealer. Do not disassemble the pump.
4.
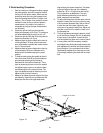
Steering Lever Adjustments:
Place the
mower on level ground with the engine run-
ning, parking brake off and steering levers
opened out to the neutral position. If the
Mower begins to creep, adjust the Steering
Levers.
If the mower creeps, first determine whether it
creeps to the right or left side and which direc-
tion the mower moves — to the front or the
rear. To make the adjustment, place the steer-
ing levers in the opened-out neutral position
and set the parking brake, shutoff the engine,
take the key from the ignition switch and pivot
the seat forward. If the mower creeps to the
right, you will adjust the linkage on the left
side of the mower and vice-versa. Remove
the cap screw and lock washer that secure
the linkage control arm rod end bearing to the
control lever pivot. Loosen the jam nut which
prevents the rod end bearing from turning. If
the mower creeps forward, thread the rod end
bearing one-half turn clockwise into the link-
age control arm. If the mower creeps back-
ward, thread the rod end bearing one half turn
counterclockwise out of the linkage control
arm. Then tighten the jam nut and reconnect
the rod end bearing to the control lever pivot
by replacing the cap screw and lock washer.
After adjusting the steering linkage, swing the
seat back to its normal position and place the
steering lever on the side you adjusted up to
the operating position. If you feel a slight push
forward or a slight pull backward from the
neutral position you must adjust the lever
return assembly. To do this, swing the steering
lever back out to the neutral position, pivot the
seat forward and loosen the jam nut on the
lever return rod where it is threaded into the
hex-shaped end of the lever return bolt. If the
steering lever was pushed forward, turn the
hex-shaped lever return bolt clockwise one-
half turn off of the lever return rod. If the steer-
ing lever was pulled back, turn the hex shaped
lever return bolt counterclockwise one-half
turn onto the lever return rod. Then tighten the
jam nut, pivot the seat back into the operating
position and start the mower to check that
your adjustments were made correctly.
G. Storage
1.
General:
If your mower will not be in service
for a few months, it should be stored in a dry
location that is not subject to drastic changes
in temperature. Before storing, the following
maintenance procedures should be per-
formed.
a. Clean the mower. The entire tractor and
cutting deck should be washed and
cleaned.
b. Sharpen the blades so that the mower will
be ready to use when needed.
c. Protect the metal surfaces. Repair
scratches with the appropriate touch-up
spray paint. Brush a rust preventive oil on
any unpainted surfaces including the pul-
leys and blades. (Be careful not to get any
oil on the drive belts.)
d. Lubricate the mower.
e. Drain the engine oil. The engine should be
warm so that all the oil drains. Replace the
engine oil filter and refill the crankcase with
fresh oil.
f. Gasoline Engine: Drain all the fuel. Close
the fuel tank shutoff valve. Disconnect the
fuel line from the carbuetor and put the end
into an approved fuel container. Open the
fuel tank shutoff valve and drain the fuel
tank and line into the approved container.
Replace the fuel line on the carburetor.
Start the engine and allow it to run out of
fuel. This will prevent gum and varnish
deposits from forming. Replace the fuel fil-
ter.
g. Gasoline Engine Only: Remove the spark
plugs and pour approximately one ounce
of oil into each cylinder. Crank the engine
one or two turns to spread the oil evenly on
the cylinder walls. Replace the spark
plugs.
h. Clean the battery and make sure it is fully
charged.


