


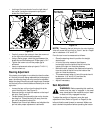

22
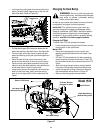
Service the Foam Precleaner
• Clean the precleaner after every 25 hours of
operation. More often if operating under extremely
dusty or dirty conditions.
• Wash the precleaner in detergent and water.
• Rinse the precleaner thoroughly until all traces of
detergent are eliminated. Squeeze out excess
water — DO NOT WRING. Allow the foam element
to air dry.
Service Paper Element
NOTE:
Refer to the Attachments & Accessories table
found on page 32 of this manual for the proper air filter.
The paper element should be replaced at least every
100 hours of operation. Replace more frequently if the
tractor is operated under extremely dusty conditions.
IMPORTANT:
Do not wash the paper element or use
pressurized air, as this will damage the element.
Examine the element and discard if dirt and/or damage
is present.
NOTE:
Handle new elements carefully; do not use if
the sealing surfaces are damaged.
• Clean any dirt or debris from the air cleaner base
and cover.
• Check the air cleaner base. Make sure it is secured
and not damaged. Also check the air cleaner cover
for damage or improper fit. Replace all damaged air
cleaner components.
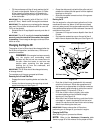
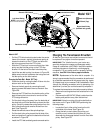
Air Filter Installation
Model 1525 ONLY
• Carefully install the paper element and foam
precleaner in the air cleaner cover.
• Insert the two hooks on the bottom of the cover into
the two channels of the air cleaner base. Refer to
Figure 19.
• Rotate the top of the cover upward and guide the
cover latches through the top slots in the base.
Push the top of the cover rearward until the latches
snap upward and lock the cover in place.
IMPORTANT:
Make certain the cover latches are
captured in the base slots. Failure to do so may allow
the cover to loosen and allow unfiltered air to be
ingested by the engine, resulting in premature wear and
failure of the engine.
Model 1527 ONLY
• Carefully Install the element (with precleaner) on
the base and secure it with the wing nut.
• Position the air cleaner cover over the base and
hook the clasps behind the tabs on the base. Refer
to Figure 19.
• Push the clasps inward toward the cover to lock
them in the closed position.
Spark Plug
Every 100 hours of operation, remove each spark
plug, check its condition, and reset the gap or replace
with a new plug as necessary.
NOTE:
Refer to the Attachments & Accessories table
found on page 32 of this manual for the proper spark
plug type.
• Lift the tractor’s hood and locate the spark plug
wires on each side of the engine.
• Carefully pull the spark plug wire boots off of the
spark plugs.
• Before removing the spark plug, clean the area
around the base of the plug to keep dirt and debris
out of the engine.
• Using a spark plug socket, remove the spark plugs
and check their condition.
• Replace a plug if worn or damaged. Clean minor
carbon deposits from the electrode using a soft wire
brush. Check and re-set the gap as instructed in the
following steps.
NOTE:
Do not clean the spark plug in a machine
using abrasive grit. Some grit could remain in the spark
plug and enter the engine causing extensive wear and
damage.
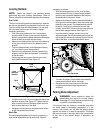
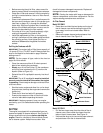
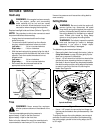
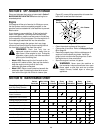
• Check the gap using a feeler gauge and adjust, if
necessary, by carefully bending the ground
electrode. See Figure 20. Set the spark plug gap to
0.75 mm (0.030 in.).
Figure 20
• Reinstall the spark plugs into the cylinder heads.
Torque the spark plug to 22 N·m (16 ft. lb.).
• Place the spark plug wire boots over the spark
plugs and press until you feel the plug wire
connectors snap over the terminal of the spark
plugs.
Feeler Gauge
Ground Electrode
Spark Plug
Gap