


ADJUSTING AND OPERATING
LEVEL ADJUSTMENT -Continued
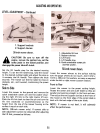
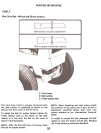
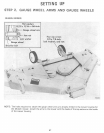
1. Support brackets2.
Support clevises
38-inch mower shown.
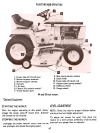
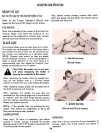
A CAUTION! Be sure to turn off the
engine, remove the ignition key, set the
brake pedal in the locked position, and
disengage the power take-off clutch.
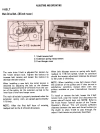
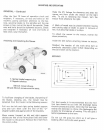
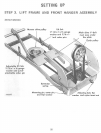
1. Adjustable lift link2.
Support clevises3.
Lift frame4.
Lift handle stop5.
Quick attachable cotter pin
and flat washer.
50-inch mower shown.
Set the lift handle stop for the desired mowing
height. To set the lift handle stop, raise the mower
to the desired cutting height and adjust the stop so
it contacts the lift handle. Then tighten the knob
securely. The mower can then be raised to cross an
obstacle, etc., and lowered, maintaining the preset
height.
Lower the mower almost to the surface making
sure the gauge wheels do not touch. Add 13/32 x
13/16 x .O65-inch flat washers, as many as required
under the left or right mower support bracket.
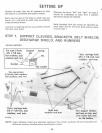
Front to Rear
Side to Side
Lower the mower to the preset cutting height.
Rotate the center and one outer blade so they are
parallel and pointing straight to the front and rear.
Then adjust the two support clevises at the front of
the mower so the front edge of the center blade is
level with the back edge of the outer blade.
Lower the mower to the ground and remove the
quick attachable cotter pin and flat washer secur-
ing the right lift link to the right tractor lift arm.
Pitch the lift link back to clear the pin and turn the
lift link clockwise or counterclockwise so the
height from the top of the mower housing to the
surface is equal on each side.
NOTE: If mower is not level, it will adversely
affect the performance.
NOTE: (38-inch mower only) If correct side to
side adjustment cannot be obtained after adjusting
the lift link, proceed as follows:
51