


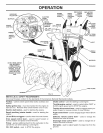
OPERATION
TO START ENGINE
Your snow thrower engine is equipped with both a 120 Volt
A.C. electric starter and a recoil starter. The electric starter
is equipped with a three-wire power cord and plug and is
designed to operate on 120 Volt A.C. household current.
• Be sure your house is a 120 Volt A.C. three-wire
grounded system. If you are uncertain, consult a
licensed electrician.
&
WARNING: Do not use the electric
starter if your house is not a 120 Volt
A.C. three-wire grounded system. Seri-
ous personal injury or damage to your
snow thrower could result.
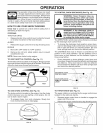
COLD START - ELECTRIC STARTER
1. Insert safety ignition key (tied to recoil start cord) into
ignitionslot until itclicks. DO NOT turn the key. Keep
the extra safety ignition key in a safe place.
2. Place throttle control in"FAST" position.
3. Place ON / OFF switch in "ON" position.
4. Rotate choke control to "FULl" position.
5. Connect the power cord to the engine.
6. Plug the other end of the power cord into a three-hole
grounded 120 Volt A.C. receptacle.
NOTE: Do not use primer when starting engine with the
electric starter.
7. Push starter button until engine starts.
iMPORTANT: Do not crank engine more than five continu-
ous seconds between each time you try to start. Wait 5 to
10 seconds between each attempt.
8. When the engine starts, release the starter button and
slowly move the choke control to the "OFF" position.
9. Disconnect the power cord from the receptacle first,
then from the engine.
Allow the engine to warm up for a few minutes. Engine will
not develop full power until it has reached normal operat-
ing temperature.
WARM START - ELECTRIC STARTER
Follow the steps above, keeping the choke control in the
"OFF" position.
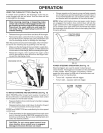
COLD START - RECOIL STARTER
1. Insert safety ignition key (tied to recoil start cord) into
ignitionslot until itclicks. DO NOT turn the key. Keep
the extra safety ignition key in a safe place.
2. Place throttle control in"FAST" position.
3. Place ON / OFF switch in "ON" position.
4. Rotate choke control to "FULl" position.
5. Push the primer four (4) times if the temperature is
below 15°F, or two (2) times iftemperature is between
15° and 50°R If temperature isabove 50°F, priming is
not necessary.
NOTE: Over priming may cause flooding, preventing the
engine from starting. If you do flood the engine, wait a few
minutes before attempting to start and DO NOT push the
primer.
6. Pull recoil starter handle quickly. Do not allow starter
rope to snap back.
7. When the engine starts, release the recoil starter handle
and slowly move the choke control to the "OFF" posi-
tion.
Allow the engine to warm up for afew minutes. Engine will
not develop full power until it has reached normal operat-
ing temperature.
WARM START- RECOIL STARTER
Follow the steps above, keeping the choke in the "OFF"
position. DO NOT push the primer.
BEFORE STOPPING
Run the engine for a few minutes to help dry off any mois-
ture on the engine.
iF RECOIL STARTER HAS FROZEN
If the recoil starter has frozen and will not turn the engine,
proceed as follows:
1. Grasp the recoil starter handle and slowly pull as much
rope out of the starter as possible.
2. Release the recoil starter handle and let itsnap back
against the starter.
If the engine still fails to start, repeat the above steps or
use the electric starter.
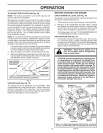
SNOW THROWING TIPS
• Always operate the snow thrower with the engine at
full throttle. Full throttle offers the best performance.
• Go slower indeep, freezing or heavy wet snow. Use the
drive speed control, NOT the throttle, to adjust speed.
• It is easier and more efficient to remove snow imme-
diately after itfalls.
• The best time to remove snow isthe early morning. At
this time the snow is usually dry and has not been ex-
posed to the direct sun and warming temperatures.
• Slightly overlap each successive path to ensure all
snow will be removed.
e
e
Throw snow downwind whenever possible.
Adjust the skid plates to proper height for current snow
conditions. See "TO ADJUST SKID PLATES" in this
section of this manual.
• For extremely heavy snow, reduce the width of snow
removal by overlapping previous path and moving
slowly.
• Keep engine clean and clear of snow during use. This
will help air flow and extend engine life.
• After snow-throwing iscompleted, allow engine to runfor
a few minutes to melt snow and ice off the engine.
• Clean the entire snow thrower thoroughly after each
use and wipe dry so it is ready for next use.
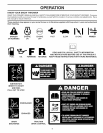
WARNING: Do not operate snow
thrower if weather conditions impair
visibility. Throwing snow during a
heavy, windy snowstorm can blind
you and be hazardous to the safe
operation of the snow thrower.
14