


CHARGING BATTERY
Although your mower battery was fully
charged when it left the factory, it is nec-
essary to recharge it before initial use.
This will ensure that the battery operates
at full performance capability.
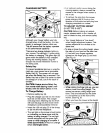
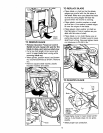
There are two charge Indicator lights on
your mower. The red light (1) glows while
the battery is charging. The green light (2)
glows when the battery is fully charged.
During the mowing season, plug the
charger into mower whenever mower is
not being used.
Safety Key
To prevent accidental start-up or unautho-
rized use, your mower has a removable
Safety Key (3). The mower will not oper-
ate when the Safety Key is removed. The
Safety Key has a hole in its center to allow
for storage on a nail, out of the reach of
children.
CAUTION: Always remove Safety Key
from mower when leavingmower unat-
tended, even for a short period of time.
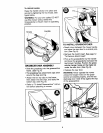
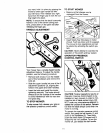
To Charge Battery
• Remove safety key (3).
• Plug the charger cord (4) into the recep-
tacle (5) on the mower. The charger
cord plug has a retaining clip (6) which
wilt lock the plug into the mower while
charging to avoid accidental removal.
• Insert the 120 volt plug (7) of the charg-
er (8) into the wall receptacle.
• The red light on the mower should come
on Indicating you have power and the
battery Is being charged. The red light
should extinguish and the green light
Gome on when oharglng is complete. It
takes approximately 24 hours to cherge
s fully dls0harged battery,
For opllmun_ pert_]tm_mce during the
mowing season, always connect the
mower to the charger when mower is
not in use.
• To remove the plug from the mower,
press retaining clip (6) firmly in the
direction of the arrow and pull plug from
charging receptacle on mower.
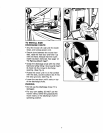
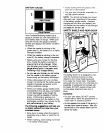
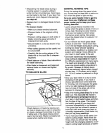
TO ADJUST CUTTING HEIGHT
(1-1/2" TO 3-1/2")
CAUTION: Before making any adjust-
ments, release switch to turn mower off,
wait for blade to stop, and remove safety
key.
• Your mower features a "one touch"
wheel height adjustment system. This
system adjusts all four wheels at the
same time.
• To raise or lower the cutting height, place
the palm of your hand on the palm rest
(1) and with your fingers squeeze
upward.on the finger grip (2) and hold.
(See Fig. A)
• While holding the finger gdp up, you _an
raise or lower the cutting height. The
mower has seven cutting height posi-
tions. They are indicated by the scale
(1) and pointer (2) at the front of the
mower. (See Fig. B)
• When you have the mower at the height