


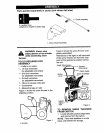
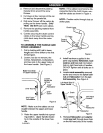

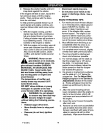


SNOW CHUTE ASSEMBLY
1. Turn crank assembly counterclock-
wise until it stop.
2. Position snow chute on inside of
snow chute flange and align the
three holes in the snow chute with
holes on snow chute flange. (See
Figure 9)
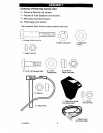
3. Place three 5/16-18 carriage bolts
from inside of chute as shown in
Figure 9. (hardware is found in
parts bag).
4. Place three 5/16-18 flatwashers
and three 5/16-18 nuts on outside
of flange.
5. Tighten all four carriage bolts se-
curely.
NOTE: DO NOT overtighten carriage
bolts.
6. Turn crank assembly clockwise and
make sure all carriage bolts are
tight.
Snow Chute
\
Flatwasher _3J_
Nut
Figure 9
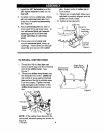
HOW TO SET THE SKID HEIGHT
Your snow thrower is equipped with
height adjust skids on the outside of the
auger housing. To adjust the skid
height for different conditions, see To
Adjust Skid Height paragraph in the
Service And Adjustment section.
_" CHECKLIST
Before you operate your new snow
thrower, to ensure that you receive the
best performance and satisfaction from
this quality product, please review the
following checklist:
P" All assembly instructions have been
completed.
P" The discharge chute rotates freely.
v" No remaining loose parts in carton.
While learning how to use your snow
thrower, pay extra attention to the fol-
lowing important items:
Engine oil is at proper level.
_' Make sure gas tank is filled properly
with clean, fresh, unleaded gasoline.
_" Become familiar with all controls-
their location and function. Operate
controls before starting engine.
F--001087J 10