


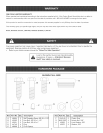


CARTON CONTENTS
Ref, Description
1 Right Mounting Bracket
2 Left Mounting Bracket
3 Locking Lever
4 Bumper
Part No.
#25038
#25037
#64862
#64614B (71-246212)
#64614S (71-246221)
#64614C (71-246231)
TOOLS REQUIRED
(2) 9/16" Wrenches
(1) 1/2" Wrench (for heat shield on page 5)
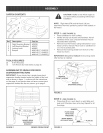
ASSEMBLING TO SINGLE ROD DECK
SUSPENSmON TRACTORS
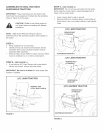
IMPORTANT: If your tractor has a single mower deck
suspension bracket located under the middle of the front
axle as shown in figure 1, continue with the instructions
on this page, if your tractor does not have a mower deck
suspension bracket like the one shown, go to page 5,
I I
_J
FIGURE 1
BRACKET
VIEWED FROM FRONT
CAUTION! Muffler is hot! Allow engine to
cool down before proceeding with bumper
installation,
NOTE: Right hand (RH) and left hand (LH) are
determined from the operator's position while seated on
the tractor,
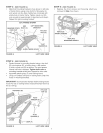
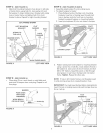
STEP 1: (SEE FIGURE 2)
, Place cardboard on work surface.
identify and lay out all parts and hardware. Not all
hardware wil! be used. Unused hardware may be
discarded after assembly.
Remove hood from tractor using instructions in your
tractor owner's manual. Place hood on cardboard or
on a mat to protect paint.
, Remove the browning shield from the front of the
tractor as shown.
IMPORTANT: Be sure to reattach the browning shield
after bumper is installed,
REMOVE
FRONT SCREWS
REMOVE
BROWNmNGSHmELD
FIGURE 2
STEP 2: (SEE FIGURE 3}
Place plug (D) on a work bench or solid table and
push end of bumper down onto plug. Repeat for all
four plugs.
BUMPER
PUSH DOWN
WiTH EVEN
PRESSURE
WORK BENCH
OR SCUD TABLE
FIGURE 3
3