


22
SERVICE AND MAINTENANCE
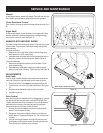
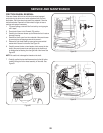
FRICTION WHEEL REMOVAL
If the snow thrower fails to drive with the drive control engaged,
and performing the drive control cable adjustment fails to correct
the problem, the friction wheel may need to be replaced. Follow the
instructions below. Examine the friction wheel for signs of wear or
cracking and replace if necessary.
To prevent spillage, remove all fuel from tank by running engine 1.
until it stops.
Place the shift lever in third Forward (F3) position.2.
Carefully pivot the snow thrower up and forward so that it rests on 3.
the auger housing.
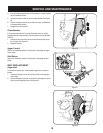
Remove the frame cover from the underside of the snow thrower 4.
by removing four self-tapping screws which secure it.
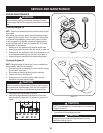
Remove the right-hand wheel by removing the screw and bell 5.
washer which secure it to the axle. See Figure 29.
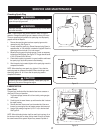
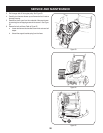
Carefully remove the hex nut and washer which secures the hex 6.
shaft to the snow thrower frame and lightly tap the shaft’s end
to dislodge the ball bearing from the right side of the frame. See
Figure 30.
NOTE: Be careful not to damage the threads on the shaft.
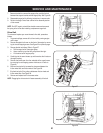
7. Carefully position the hex shaft downward and to the left before
carefully sliding the friction wheel assembly off the shaft. See
Figure 31.
Figure 30
Figure 31
Figure 29