


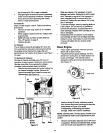
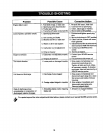

Removing Flail Screen
ifthe discharge area becomes clogged, remove the
flailscreen and clean area as follows.
• Stop engine, make certain the chipper-
shredder has come to a complete stop and
disconnect spark plugwire from the spark plug
before unclogging the chute.
• Remove the two hand knobs on each side of
the discharge chute (also called the chute
deflector).
• Liftthe discharge chute up,and keep itout of
the way.
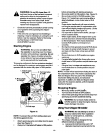
• Remove two hex boltswhich extend through
the housing. See Figure 18.
• Pullthe flailscreen from inside the housing.
See Figure 18.
• Clean the screen byscraping or washing with
water.
• Reinstall the screen.
• Put the discharge chute back to itsoriginal
position and tighten the hand knobs.
NOTE: Be certain to reassemble the flailscreen with
the curved side down.
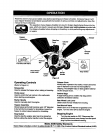
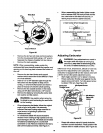
Chute Deflector
by removingthroe pairs ofhex nut and cupped
washer.
Holdingthe chute to the frame, remove the hex
boltsthat secure the brace to the frame. Remove
the brace. You will need a 7/16" wrench for this.
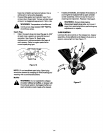
Rotatetheimpellerassemblyby _and untilyou
locateone ofthe two chipperblades inthe chip_er_
chuteopening.Remove theblade, usinga 3/16"
allenwrenchon the outsideofthebladeand 1/2"
wrenchonthe impellerassembly(insidethe
housing).See Figure 19.
Slot Blade
Flail Screen
Hex Nut,
Washer
Hand Knobs
Figure 18
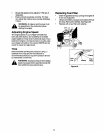
Sharpening Or Replacing Blades
Chipper Blades
• Disconnect spark plug wire and move itaway
from spark plug.
• Remove the flailscreen as instructed.
• Using a 1/2" wrench, remove the chipper chute
Figure 19
• Remove the other blade i_the _ame manner.
• Replace or sharpen blades.
• Ifsharpening, make certain to remove an equal
amount from each blade.
• Reassemble in reverse order. Make certain
blades are reassembled with the sharp edge
facing the direction shown in Figure 19 (sharp
edge isassembled toward the slottedopening at
the bottom).
• Torque boltsand nutsto 250-300 inch-pounds.
Shredding Blade
The shredding blade may be removed for sharpening
or replacement as follows.
• Disconnect spark plug wire and move itaway
from spark plug.
• Lower the hopper assembly. Block up the
housing. See Figure 20.
15