


12
OPERATION
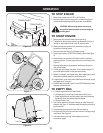
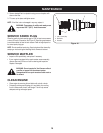
TO STOP ENGINE
1. Move throttle control lever to STOP or OFF position.
2. Disconnect spark plug wire and ground it to the retaining post to
prevent accidental starting while the equipment is unattended.
WARNING: When moving throttle control lever,
be careful of heated surfaces and sharp edges on
muffler guard.
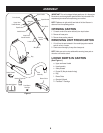
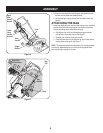
TO START ENGINE
1. Attach spark plug wire and rubber boot to spark plug.
2. The bag/chute switch button must be fully depressed by the tip of
front tab on bag handle or blower chute for engine to start.
3. Make sure bag/chute switch wire is connected to engine and
grounded to mounting bracket.
4. Gas tank should be filled 3/4 to full before starting.
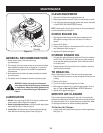
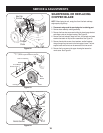
5. Move throttle control to START/RUN (Rabbit) position. See Figure
10.
6. Move the choke control toward the throttle control to choke the
engine’s carburetor. (A warm engine may not require choking.) See
Figure 10.
7. Standing behind the unit, grasp starter handle and pull rope out
until you feel a drag.
8. Pull the rope with a rapid, continuous, full arm stroke. Keep a firm
grip on the starter handle. Let the rope rewind slowly.
9. Repeat, if necessary, until engine starts. When engine starts, move
choke control gradually away from the throttle control.
10. If engine falters, move choke control back toward the throttle control
and repeat steps 7 through 9.
11. ALWAYS keep the throttle control in the START/RUN position when
operating the Yard Vacuum.
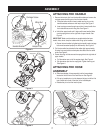
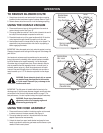
TO EMPTY BAG
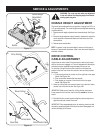
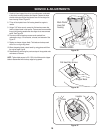
1. a. Unhook bag straps from the lower handle.
b. Unsnap bag clip from the top of lower handle. See Figure 11.
c. Grasp bag handle with one hand and pull lock rod on mounting
bracket with other hand toward engine to release.
d. Lift bag off back of unit.
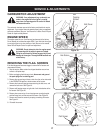
2. Twist the two buttons on the back of the bag to unlock and empty
contents. See Figure 12. Hold bag handle and bag clip while empty-
ing the contents.
3. Compress bag opening and fold inner flap over opening.
4. Fold outer flap over inner flap and insert buttons on the bag through
metal outlets. See Figure 12.
5. Twist the buttons to lock bag. Place bag back onto unit as
instructed on page 8.
Figure 10
4HROTTLE#ONTROL
#HOKE#ONTROL
Figure 11
Figure 12
A
B
C
D
Outer Flap
Inner
Flap
Buttons