


General Recommendations
_lb WARNING: Always stop engine and disconnect spark plug wire before any maintenance or adjustments.
Always maintain safety and follow instructions given below closely for smooth completion of job.
The warranty on this riding mower does not cover items that have been subjected to operator abuse or
negligence. To receive full value from the warranty, operator must maintain the riding mower as instructed in
this manual. Refer to the Maintenance Schedule below.
We do not recommend the use of pressure washers or garden hose to clean your unit. These may cause
damage to electrical components, spindles, pulleys, bearings or the engine. The use of water may shorten life
of your riding mower and reduce its serviceability
To ensure safe operation, all nuts and bolts must be checked periodically for correct tightness.
Maintenance Schedule
First 5 hrs. 25 hours 50 hours 100 hrs. Season Reassembly
Check blade, sharpen or replace if needed _
Lube pivot points, steering shaft, gear
Lube deck linkage, front wheels
Change engine oil _
Service air cleaner in engine
Service spark plug ,_
Clean cooling system of the engine
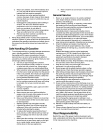
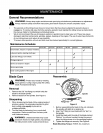
Blade Care
_ WARNING: Protect your hands by wearing
heavy gloves or using a rag to grasp the cutting
blade. Avoid personal injury.
Removal
1. Remove the 5/8" hex flange nut which holds the
blade to the blade spindle.
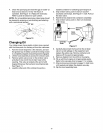
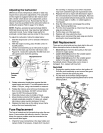
2. Remove blade from the spindle. See Figure 8.
Sharpening
1. When sharpening the blade, follow original angle of
grind as a guide. It is extremely important to grind
each cutting edge equally to prevent an
unbalanced blade.
2. Test the blade by balancing it on a round shaft
screwdriver. Remove metal from the heavy side
until it balances evenly.
i_ WARNING: Unbalanced blade may cause
excessive vibration at high speeds, may damage
the riding mower and/or cause personal injury.
Reassembly
Spindle
I
_Blade
Figure 8
1. Before reassembling the blade to the unit, lubricate
the spindle with light oil (or engine oil).
2. Align "star" fitting on new blade with the "star" on
the spindle.
3. Install the blade with the side of the blade marked
"Bottom" (or with part number) facing the ground
when the riding mower is inthe operating position.
4. Tighten the flange nut securely. See Figure 8.
Blade Mounting Torque: 70/90 ft.-tbs, maximum.
13