


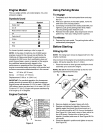

Type of Oil
1. Refer to the chart below for proper grade of oil.
2. Use a high quality detergent oil classified "For
service SF, SG,SH, SJ" or higher.
3. Do not use special additives.
Synthetic oil meeting ILSAC GF-2, API certification and
API service symbol with "SJ/CF Energy Conserving" or
higher is an acceptable oil at all temperatures. Use of
synthetic oil does not alter required oil change intervals.
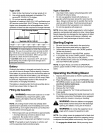
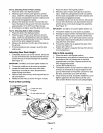
SAE Viscosity Grades
30
_5W-30, 10W-30
L
°F -20°' 0°' 20°' 40°' 60°' 80°' 100°'
Startingtemperature range anticipatedbefore next oilchange
* CAUTION: Air cooled engines run hotter than automotive
engines. The use of non-synthetic multi-viscosity oils (5W-
30, 10W-30 etc.) in temperatures above 40°F will result in
higher than normal oil consumption. When using a multi-
viscosity oil, check oil level more frequently.
** CAUTION: SAE 30 oil, if used below 40°F, will result in
hard starting and possible engine bore damage due to
inadequate lubrication.
Battery
Ordinarily the battery is charged and ready for use; so
you will not have to charge it before starting. However,
if the battery is put into service for the first time after the
date shown on the side of the battery, you will have to
charge it for a minimum of one hour at 4-6 amps. Refer
to Service & Adjustments section of this manual for
instructions on charging the battery.
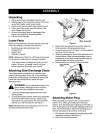
The battery is located under the hood assembly above
the left rear wheel. Refer to Figure 20.
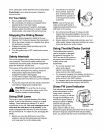
Filling Up Gasoline
,_ WARNING: Fill fuel tank outdoors or in well-
ventilated area, away from sparks, open
flames, pilot lights, heat and other ignition
SOUrCeS.
NOTE: On a riding mower which has already been
started and/or operated once immediately prior to this
gasoline fill-up, turn engine off and let cool at least two
minutes before removing gas cap.
1. Remove gas tank cap and fill tank to approximately
1.5 inches below top of neck to allow for fuel
expansion. Be careful not to overfill.
2. Replace cap on the gas tank and tighten to secure.
NOTE: If fuel spills on part of engine or vehicle, wait
until it evaporates before starting engine.
Type of Gasoline
• Use clean, fresh, regular unleaded gasoline with
minimum 85 octane rating.
• Do not use gasoline mixed with methanol, or
gasoline which has been stored for more than 30
days. Always purchase fuel in quantity that can be
used up within 30 days. Fresh fuel prevents gum
from forming in the fuel system or on carburetor.
• Do not mix gasoline with engine oil.
NOTE: Some fuels, called oxygenated or reformulated
gasoline, are blended with alcohol or ether. Using these
blends frequently can damage the fuel system or affect
performance. If engine performance is affected, use
gasoline with Iower percentage of alcohol or ether.
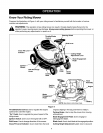
Starting Engine
1. Be sure the wire is attached to the spark plug.
2. Depress the brake pedal with your right foot.
3. Set throttle/choke control in the CHOKE position
(all the way forward).
4. Place the shift lever in the NEUTRAL position.
5. Turn ignition key to the START position. Once the
engine starts, let key return to ON position.
6. Move throttle/choke control out of CHOKE position
and into FAST throttle position.
NOTE: If engine floods, set choke to OPEN/RUN
position, place throttle in FAST and crank until engine
starts.
Operating the Riding Mower
1. Depress the brake pedal so that the parking brake
is disengaged.
2. Place the shift lever in either the FORWARD or the
REVERSE position as you desire. Look to the rear
and check before backing up.
3. Release the brake pedal.
4. Depress the "Go" Pedal.
5. To stop, release the "Go" Pedal and depress the
brake pedal.
6. Press the blade engagement pedal downward until
the blades are turning.The blades can be engaged
either while the mower is moving or standing.
,_ WARNING: When the blades are engaged,
keep hands and feet away from the discharge
opening, the blades or any part of the deck.
_ WARNING: Do not tip the equipment at an
angle which causes the gasoline to spill.
NOTE: Your riding mower is equipped with a blade lock
to keep the blade engaged without the operator having
to depress the blade pedal continuously. See Figure 4.
7. To engage the blade lock: While pressing down
11