


4, Removethechipperchutesupportbracefromthe frameby
removingthe hexbolts.
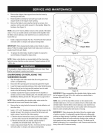
5. Rotateimpellerassemblybyhanduntil youlocateone of two
chipperbladesin thechipperchuteopening.
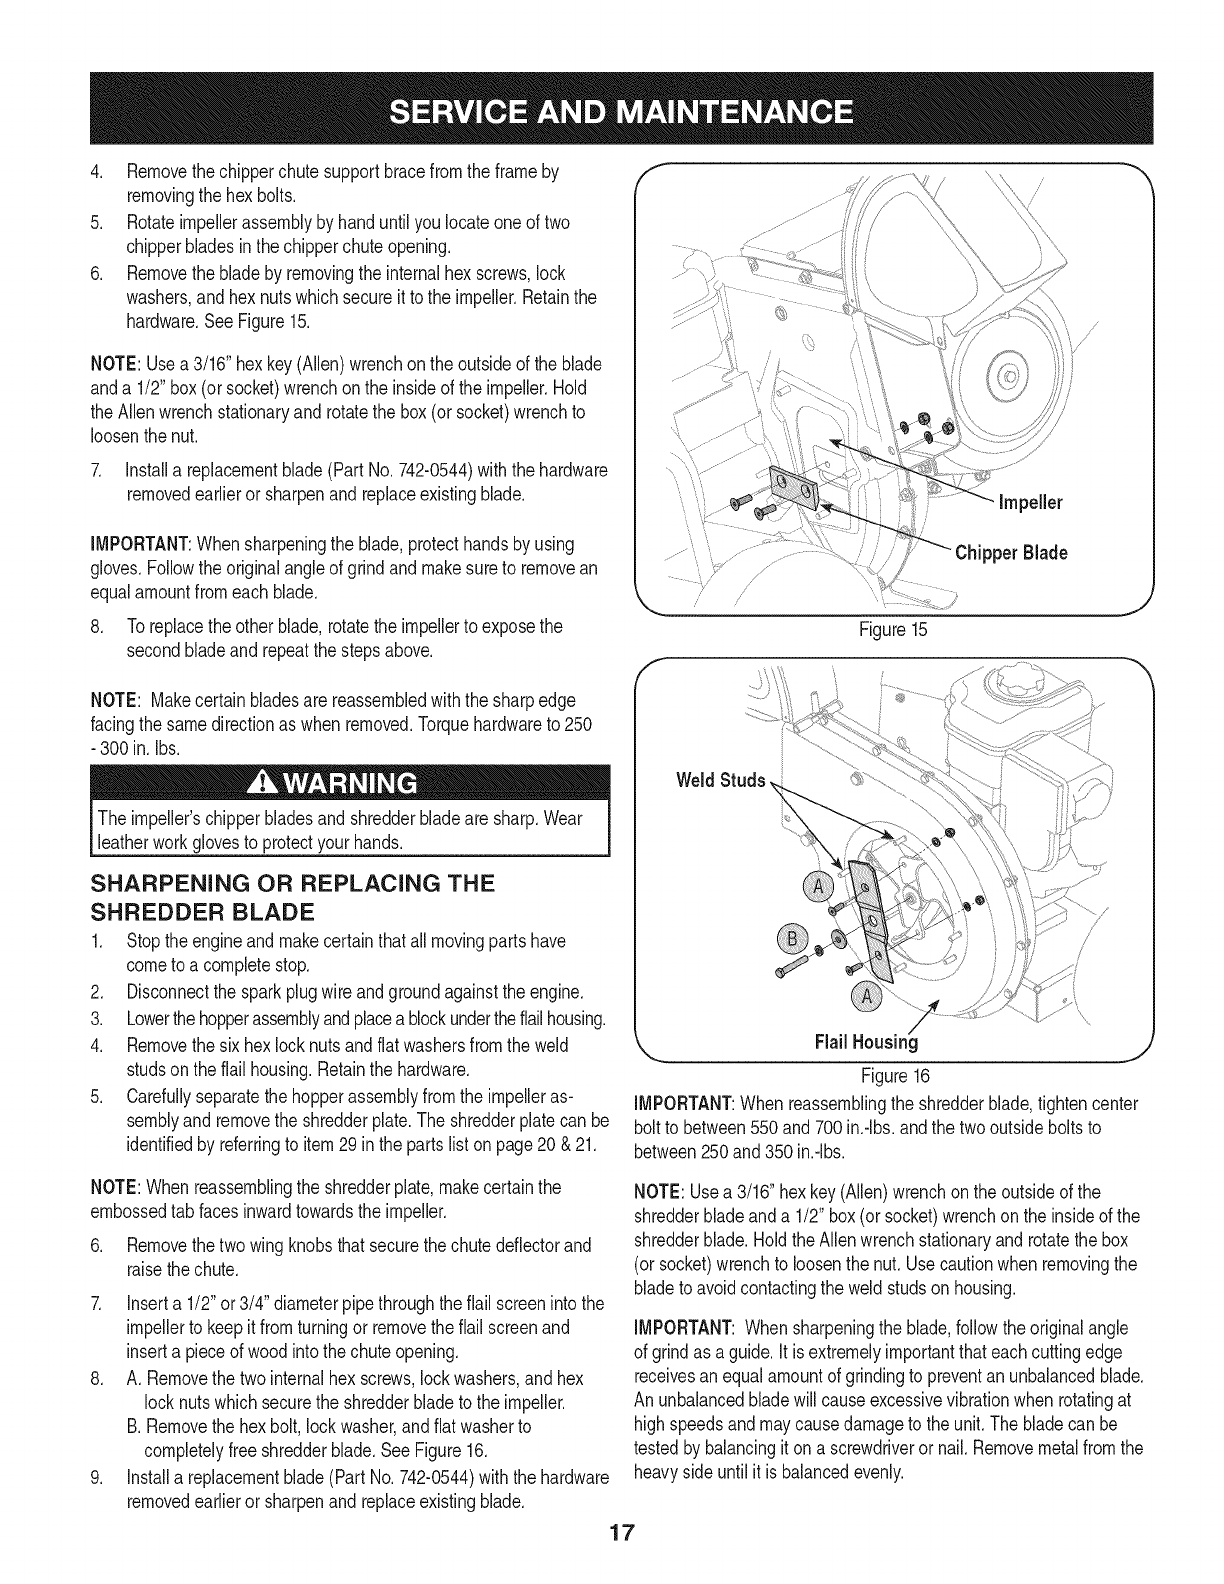
6, Removethebladeby removingthe internalhex screws,lock
washers,andhex nutswhichsecureit to the impeller.Retainthe
hardware,SeeFigure15,
NOTE:Usea3/16" hexkey(Allen)wrenchon theoutsideof the blade
anda 1/2"box(or socket)wrenchonthe insideoftheimpeller.Hold
the Allenwrenchstationaryand rotatethebox(or socket)wrenchto
loosenthenut.
7. Installa replacementblade(Part No.742-0544)withthe hardware
removedearlieror sharpenand replaceexistingblade.
IMPORTANT:Whensharpeningtheblade,protecthandsby using
gloves.Followthe originalangleofgrindandmakesuretoremovean
equalamountfromeachblade.
8. Toreplacetheother blade,rotatethe impellertoexposethe
secondbladeand repeatthe stepsabove.
NOTE: Makecertainbladesare reassembledwiththe sharpedge
facingthe samedirectionaswhenremoved.Torquehardwareto 250
- 300in. Ibs.
The impeller'schipperbladesand shredderbladearesharp.Wear
leatherworkglovesto protectyourhands.
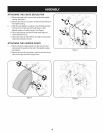
SHARPENING OR REPLACING THE
SHREDDER BLADE
1. Stopthe engineandmakecertainthatallmovingpartshave
cometo a completestop.
2. Disconnectthe sparkplugwire andgroundagainsttheengine.
3. Lowerthehopperassemblyandplacea blockundertheflailhousing.
4. Removethesix hexlocknutsandflatwashersfromthe weld
studsonthe flail housing.Retainthe hardware.
5. Carefullyseparatethe hopperassemblyfromthe impelleras-
semblyand removethe shredderplate.Theshredderplatecanbe
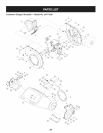
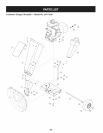
identifiedby referringto item29in thepartsliston page20 &21.
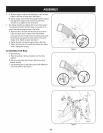
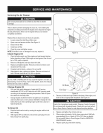
Impeller
Blade
J
Figure15
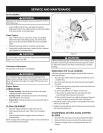
Weld Studs,
/
Flail Housing
Figure16
IMPORTANT:Whenreassemblingthe shredderblade,tightencenter
bolttobetween550and700in.-Ibs,andthe twooutsideboltsto
between250and350in.-Ibs.
NOTE:Whenreassemblingthe shredderplate,makecertainthe
embossedtab facesinwardtowardstheimpeller.
6. Removethetwo wingknobsthatsecurethe chutedeflectorand
raisethechute.
7. Inserta 1/2"or3/4" diameterpipethroughthe flail screenintothe
impellerto keepit fromturningor removethe flailscreenand
inserta pieceof woodintothechuteopening.
8. A.Removethe twointernalhex screws,lockwashers,andhex
locknutswhichsecurethe shredderbladeto the impeller.
B. Removethehexbolt,lockwasher,andflat washerto
completelyfreeshredderblade.SeeFigure16.
9. Installa replacementblade(Part No.742-0544)withthe hardware
removedearlieror sharpenandreplaceexistingblade.
NOTE:Usea 3/16"hexkey(Allen)wrenchonthe outsideofthe
shredderbladeanda 1/2"box(or socket)wrenchon theinsideof the
shredderblade.HoldtheAllenwrenchstationaryand rotatethe box
(orsocket)wrenchto loosenthenut. Usecautionwhen removingthe
bladeto avoidcontactingthe weldstudson housing.
IMPORTANT:Whensharpeningthe blade,followtheoriginalangle
of grindas a guide.It isextremelyimportantthateachcuttingedge
receivesan equalamountofgrindingto preventan unbalancedblade.
An unbalancedbladewillcauseexcessivevibrationwhen rotatingat
highspeedsandmaycausedamageto theunit.The bladecanbe
testedbybalancingit on ascrewdriverornail. Removemetalfromthe
heavysideuntilitis balancedevenly.
17