


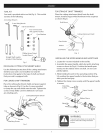
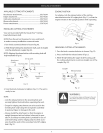
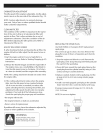
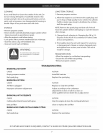


CARBURETOR ADJUSTMENT
The idle speed of the engine is adjustable. An idle adjust-
ment screw ison the rear side of the carburetor (Fig. 21).
NOTE: Careless adjustments can seriously damage
your unit. Only a Sears or other qualified dealer should
make carburetor adjustments.
CLEAN AIR FILTER
The condition of the air filter is important to the opera-
tion of the unit. A dirty or oil saturated air filter will
restrict air flow. This is often mistaken for an out of
adjustment carburetor. Check the condition of the air
filter before adjusting the idle speed screw. Refer to
Cleaning Air Filter (p.13).
ADJUST IDLE SPEED SCREW
If, after checking the fuel and cleaning the air filter, the
engine still will not idle, adjust the idle speed screw as
follows:
1.Start the engine and let it run at a high idle for a
minute to warm up. Refer to Starting/Stopping (p.10)
instructions.
2. Release the throttle trigger and let the engine idle. If
the engine stops, use a small phillips or fiat blade to
turn the idle speed screw in, clockwise, 1/8 of a turn
at a time (as needed) until the engine idles smoothly.
NOTE: The cutting attachment should not rotate when
the engine idles.
3. If the cutting attachment rotates when the engine
idles, turn the idle speed screw counterclockwise
1/8 of a turn at a time (as needed), to reduce idle
speed. Checking the fuel, cleaning the air filter, and
adjusting the idle speed should solve most engine
problems. If not and all of the following are true,
check the spark plug for proper gap and condition.
• the engine will not idle
• the engine hesitates or stalls on acceleration
• there is a loss of engine power
If problem still occurs, have the carburetor adjusted by
a Sears or other qualified service dealer.
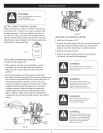
WARNING:
Do not sand blast, scrape, or clean
spark plug electrodes. Grit in the
engine could damage the cylinder.
Idle Adjustment
Screw
Fig.21
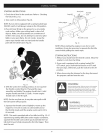
REPLACING THE SPARK PLUG
Use NGK CMR6A or Champion RCJ6Y replacement
spark plugs.
The correct air gap is 0.02 in. (0.5 mm). Remove the
plug after every 25 hours of operation and check its
condition.
1.Stop the engine and allow it to cool. Remove the
spark plug cover. Grasp the plug wire firmly and pull
the cap from the spark plug.
2.Clean dirt from around the spark plug. Remove the
spark plug from the cylinder head by using a 5/8 in.
socket, turning it counterclockwise.
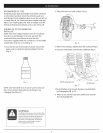
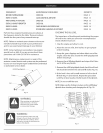
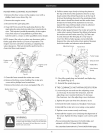
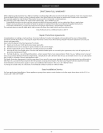
3.Replace cracked, fouled or dirty spark plug. Set the
air gap at 0.02 in. (0.5 mm.) using a feeler gauge
(Fig 22).
4.Install a correctly-gapped spark plug in the cylinder
head. Turn the 5/8 in. socket clockwise until snug.
If using a torque wrench torque to: 110-120 in. lb.
(12.3-13.5 N-m)
NOTE: Do not over tighten.
0.02 in.
(0.5mm)
Fig.22
14