


SECTION II - ASSEMBLY INSTRUCTIONS
PACKAGE CONTENTS
SKID
PARTS BOX BOLT BAG
CHIPPER CHIPPER HOPPER 4 EA – 5/16-18 X ¾” CARRIAGE BOLTS
TOW BEAM HITCH PLATE 3 EA – 5/16-18 X 1” HHCS
PARTS BOX GLASSES 7 EA – 5/16-18 NYLOCK NUTS
OWNER’S MANUAL 4 EA – 5/16 USS FLATWASHERS
ENGINE MANUAL 1 EA – ¼-20 X 1 1/4” U-BOLT
BOLT BAG 2 EA – ¼-20 NYLOCK NUTS
KNIFE GAUGE 2 EA – ENGINE KEY
TOOLS REQUIRED FOR ASSEMBLY
• 1/2” Wrench or Socket - 2 required
STEP I - UNPACKING AND CHECKING CONTENTS
1. Remove the carton and place the unit on its wheels.
2. After unpacking the shipping carton, compare the contents with the list above.
3. If any parts are missing or damaged, contact Country Home Products at 800-376-9637.
4. Assembly should be done on a clean, level surface.
STEP II - UNIT ASSEMBLY INSTRUCTIONS
1. Assemble chipper hopper (item #20, pg 30) to machine using four each 5/16”-18 x 3/4” carriage bolts, 5/16”-18
nylock nuts and 5/16” flatwashers from the bolt bag. Put head of bolt inside hopper with threads sticking out.
Tighten all hardware with a ½” wrench.
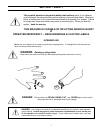
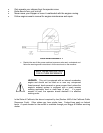
2. Attach the tow beam (item #2, pg 28) to the axle of the machine by putting the u-bolt (item #26, pg 28) from the
bolt bag around the axle and through the two holes in the tow beam per the picture on page 29. Secure with
two ¼-20 nylock nuts.
3. Attach the center of the tow beam to the front of the frame as shown on page 29 with a 5/16-18 x 1” HHCS and
a 5/16-18 nylock nut.
4. Attach the hitch plate (item # 3, pg 28) to the tow beam as shown on page 29 with two 5/16-18 x 1” HHCS (item
#18, pg 28) and two 5/16-18 nylock nuts (item #19, pg 28).
5. Service the engine as per the engine manual.
6. Lubricate both rotor bearings every 8 hours of operation with multi-purpose grease. Also check the bearing
collar set screws regularly to be sure they are tight. If they are loose, reset them with Loctite 243, obtainable at
any hardware store.
10