


STEP II – ASSEMBLING THE CHIPPER HOPPER
1. Assemble chipper hopper (item #20) to machine using four each 5/16”-18 x 3/4” carriage bolts (item #19), 5/16”
flatwashers (item #3) and 5/16”-18 nylock nuts (item #10). Put head of bolt inside hopper with threads sticking
out. Tighten all hardware with a ½” wrench.
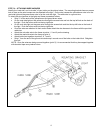
STEP III – ATTACHING THE HITCH ARMS AND TRAILER HITCH ASSEMBLY
• Attach the hitch arms (item #5) to the trailer frame using the two hitch arm mounting plates (item #22) and four
1/2”-13 x 1-1/4” HHCS (item #40) from the bolt bag. Do not
tighten hardware at this time.
• Attach the trailer hitch assembly (item #6 & #9) to the hitch arms as shown in drawing with two 1/2”-13 x 3”
HHCS (item #41) and two 1/2”-13 gripco nuts (item #42) from the bolt bag. Tighten all hardware.
• Slide the stand (item #7) up through the holes in the hitch assembly and secure with the hair cotter pin (item
#36).
11