


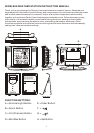


3
Radio Controlled (R/C) Time Reception Set Up:
The clock attempts to synchronize with the Atomic time signal AUTOMATICALLY right after the
first remote sensor is registered. The unit starts synchronizing the clock after registering the
remote sensor thermometer reading. The clock will not respond to any manual settings while
attempting to receive the Radio Control Time signal. This reception cycle lasts from 2 to 5
minutes. The tower icon in the left hand corner of the screen appears fixed when reception is
successful. To turn the reception off and to enable manual settings, press the " " button.
Entering the Time Zone:
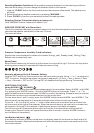
After establishing your time signal, press SET/ ZONE once to select PST/ MST/ CST or EST time
zones. A small P, M, C, E icon will appear to the left of the time display for the respective time
zone.
P = Pacific Standard Time
M = Mountain Standard Time
C = Central Standard Time
E = Eastern Standard Time
How to Manually Synchronize Your Atomic Clock:
Hold the " " button for 3 seconds to trigger a manual synchronization. The tower will flash
regularly during synchronization. Signal strength level is indicated in this way:
1. Very Weak or no signal ( )
2. Weak ( )
3. Good ( )
4. Icon appears fixed (Reception successful)
5. Icon does not show (No signal received & decoded)
If signal level is weak and time reception is not successful, move the unit away any source of
possible interference and try again in another location. The R/C clock will attempt a daily
synchronization at 1:00 AM everyday. If not successful, the R/C clock will search for the time
signal every hour. Each R/C reception cycle lasts from 2 minutes to 5 minutes. To avoid
interference, the unit will disable the other button functions during Radio Controlled Time
reception. This is not a defect. Simply press " " button to turn Radio Controlled Time
reception temporarily off.
Daylight Saving Time (DST) Feature:
The feature is enabled when the batteries are installed. The DST icon appears in the upper right
hand corner. For areas not using DST in summer, select DST off mode as described under
Manually Adjusting Clock & Calendar Setting.
STEP THREE: SETTING UP YOUR WEATHER FORECASTER
Enter Existing Weather Conditions:
To ensure a more accurate weather forecast based on the altitude of your location, enter the
existing weather conditions. The unit will relate the existing weather conditions with the current
air pressure level.
The home unit will ask you to enter the existing weather conditions right after installing the
batteries. Please select the correct weather condition by pressing "MIN/MAX" and press "CLEAR"
to enter. The home unit will try to seek for a remote sensor after the weather conditions are
entered.