


2
STEP ONE: SETTING UP THE WIRELESS THERMOMETER
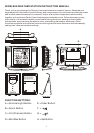
Home Receiver Set Up:
For the initial installation, always insert batteries to the home unit first and then the remote
sensor. Remove the battery cover on the back and install 2 "AA alkaline or lithium batteries" (not
included) according to the polarity indicated. Replace the battery cover. The home unit will start
to search for a sensor transmitting outdoor temperature & humidity information during the first 5
minutes after entering the existing weather condition. To enter the existing weather conditions
select the correct weather condition by pressing "MIN/MAX" and press "CLEAR" to enter. The
home unit will try to seek for a remote sensor after the weather conditions are entered.
The outdoor temperature and humidity section will flash during channel registration. If you press
the CH key it will disable the registration mode and go to radio controlled clock reception mode.
Remote Sensor Set Up:
Remove the bracket stand and remove the 4 screws with a small Philips head screwdriver. Insert
2 "AAA" alkaline or lithium batteries (not included) according to the polarity indicated. Set
Channel 1 for the first remote sensor. You must set to Ch 1 if only one sensor is in use. One
sensor is included with the base unit. Additional sensors may be purchased separately. Set
channel 2 if using a second sensor or channel 3 if using a third sensor.
• To verify transmission of a signal press the TX button inside the battery compartment of the
remote sensor. The red LED on the front of the remote sensor will flash when it successfully
transmits a signal. Temperature and humidity of the remote sensor will be updated and
displayed on the remote sensor.
• Select Celsius or Fahrenheit by pressing the C/F button inside the battery compartment.
• Replace the cover and tighten the 4 screws.
• When replacing the batteries in the remote sensor remember to clear the corresponding
channel on the home receiver unit in this way: Select the respective channel by pressing the
CH button, hold the CH button 3 seconds to clear the channel.
Placement of Remote Sensor:
Place the remote sensor out of direct sunlight and direct exposure to rain or snow. At extremely
low temperatures, below 15F, battery voltage output decreases. The low temperatures may
cause your outdoor temperature reading to go blank. Using lithium batteries can increase the
effective temperature range as they function at lower temperatures than alkaline batteries. For
prolonged periods of extreme cold we recommend the remote sensor be brought indoors. Metal
structures, walls and electrical interference can shorten the transmission range of the remote
sensor. Please try several locations to determine the best reception of the signal by the home
unit.
STEP TWO: SETTING THE ATOMIC CLOCK
About The Atomic Clock:
The National Institute of Standard and Technology (NIST) in Fort Collins, Colorado broadcasts
the time signal (WWVB at 60kHz AM radio signal) with an accuracy of one second per every
3,000 years. The signal covers a distance up to 2,000 miles from the source.
Selecting the Ideal Location:
Like a typical AM radio, the Atomic Clock will not receive the WWVB signal in places surrounded
by heavy concrete or metal panels. For best reception, please install the home receiver near a
window. The time signal reception is also greatly affected by electrical or electronic interference.
If the home receiver location you selected does not work, change to a location in another part of
the room or building.